I Bought a Website – Now What?
So, you’ve just bought a website – congratulations! It’s an exciting time, and you may feel like the possibilities are endless.
But now that you’ve taken the plunge, there is a lot of work to do if you want your website to be successful.
Regardless of how complicated the next steps might sound, there are only three things you need to care about:
- Content
- Links
- Technical SEO
There’s an SEO audit to carry out, technical issues to be resolved, and content to be created.
It can all seem a bit daunting at first, but the good news is that with some planning and preparation, you’ll be able to get your website growing quickly.
In this article, we’ll take a look at the steps you should take after purchasing a website to get it in top shape as quickly and efficiently as possible.
From getting to know it from the inside out, to optimizing it for success – we’ll cover all of the key elements you should consider when starting from scratch.
We’ll also share some tips and tricks to help you get the most out of your website and ensure it’s running smoothly.
Join us as we take a look at what you should do after buying a website.
Videos On Buying Websites:
1. Get to Know Your New Website From the Ground Up
Before you start making changes to your website, you must take some time to get to really know it – inside and out.
It’s important to understand what makes it tick and how each of its elements work, both separately and in relation to others.
Without this understanding, there’s a greater risk that something may go wrong further down the line.
So, spend some time analyzing every aspect of your website and understanding exactly how it works.
Essential Overview
Start by auditing your website using tools like Google Search Console or Ahrefs, which provide an in-depth analysis of everything from SEO performance to technical issues, such as broken links or missing tags on pages.
Google Search Console provides key data on user SERP interactions under its Performance tab.
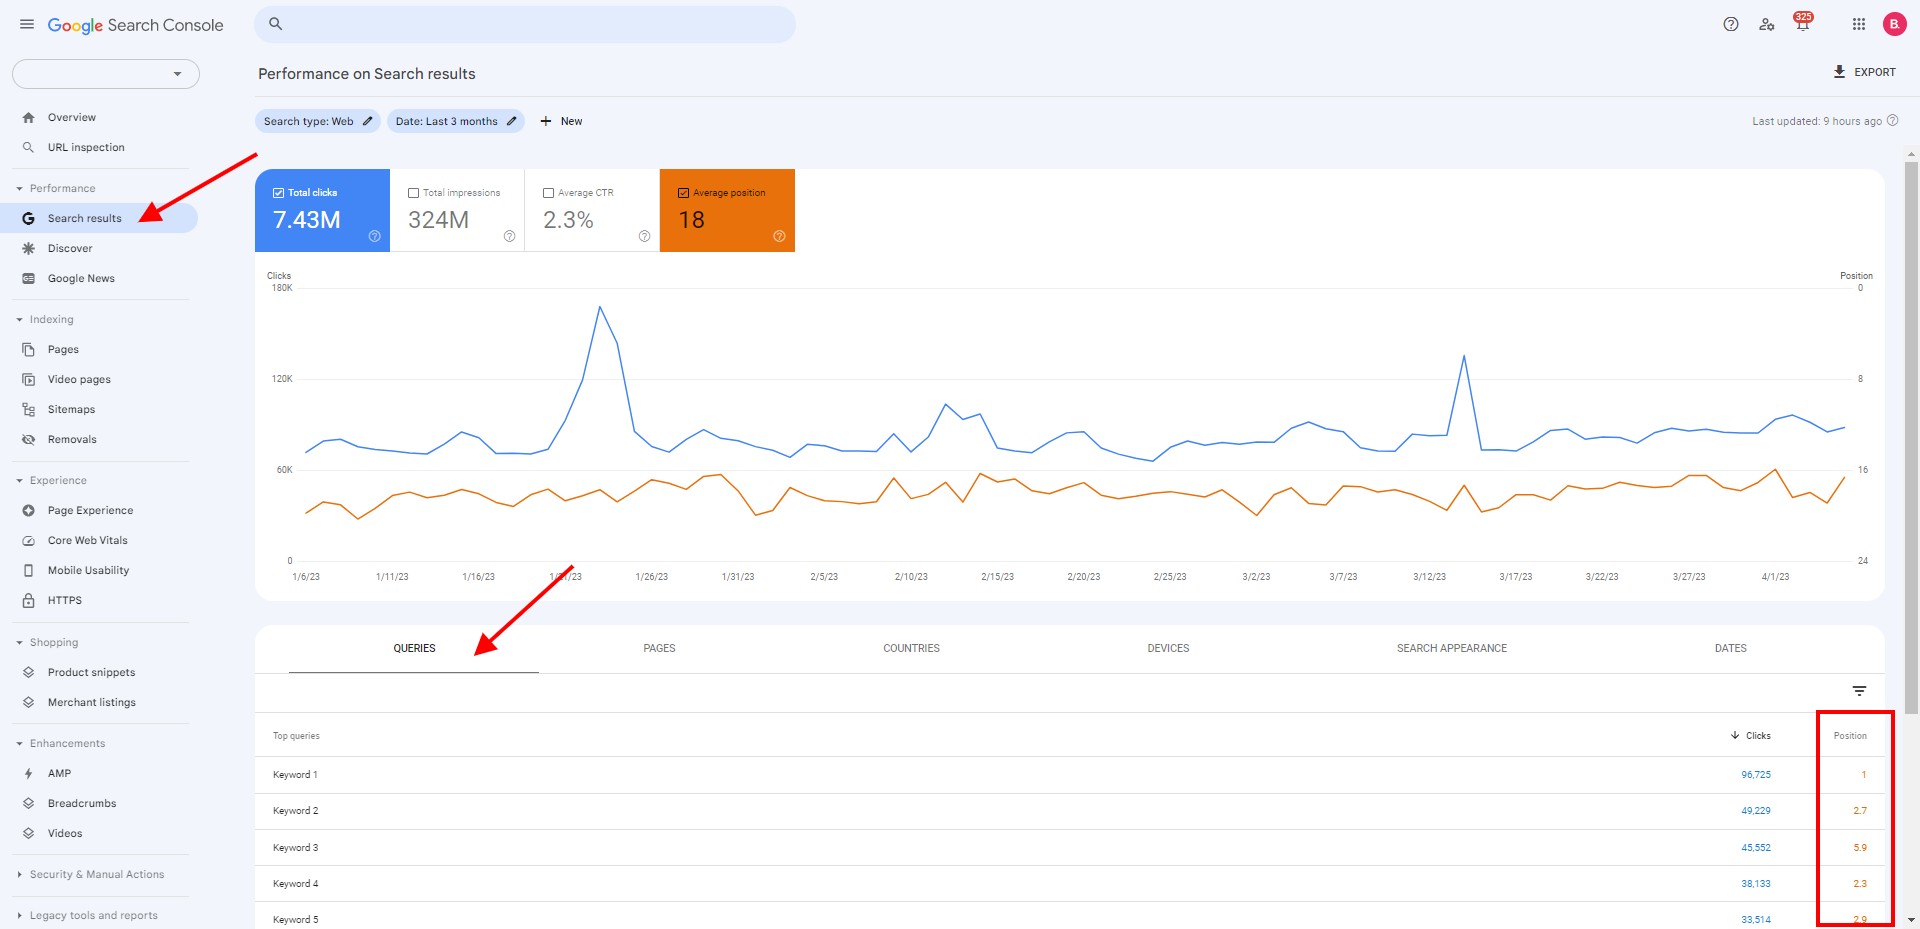
By default, this is set to queries and a three-month time period, which allows users to understand the main keywords driving organic traffic.
Focus should be placed on both keywords that are generating high clicks, but also the organic positions of those keywords.
In cases of organic decline, a key feature that GSC allows is the use of date comparisons, which enables you to compare the performance between two periods.
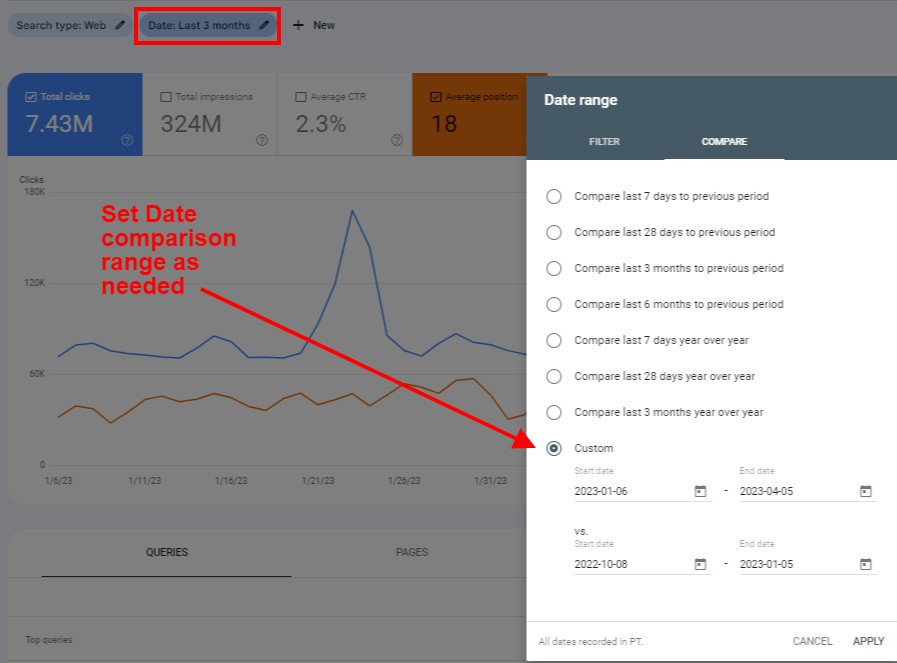
With an appropriate time selected, you get a granular view of keyword performance.
Now you can see better into it and identify areas of organic decline by reviewing the click and position difference.
This will help you identify any potential problems quickly, so they can be rectified before they cause more serious damage down the road.
You can also outsource this task.
I and many of my clients get our websites audited by Husky Hamster which you can check out here.
Content Overview
From there, take a look at the content.
Some very valid questions about the content are:
- Is it relevant to your audience?
- Is it optimized for search engines?
- Can the user experience be improved?
If you’re taking over an existing website, review the content and identify any areas where updates can be made.
One thing you can pay attention to is the content formatting.
Here’s a very useful Twitter thread that covers it in detail:
Whenever people look at a 𝗯𝗹𝗼𝗰𝗸 𝗼𝗳 𝗹𝗼𝗻𝗴 𝘁𝗲𝘅𝘁, they see nothing because they are very likely to 𝗷𝘂𝘀𝘁 𝘀𝗸𝗶𝗽 𝗶𝘁.
— Rad Paluszak 🎨 Technical SEO Artist (@radpaluszak) June 29, 2022
Unless they are very inclined to read it…
I want to emphasize 𝘁𝗵𝗲 𝗶𝗺𝗽𝗼𝗿𝘁𝗮𝗻𝗰𝗲 𝗼𝗳 𝗰𝗼𝗻𝘁𝗲𝗻𝘁 𝗳𝗼𝗿𝗺𝗮𝘁𝘁𝗶𝗻𝗴. 🧵 pic.twitter.com/0JK8t7sqSy
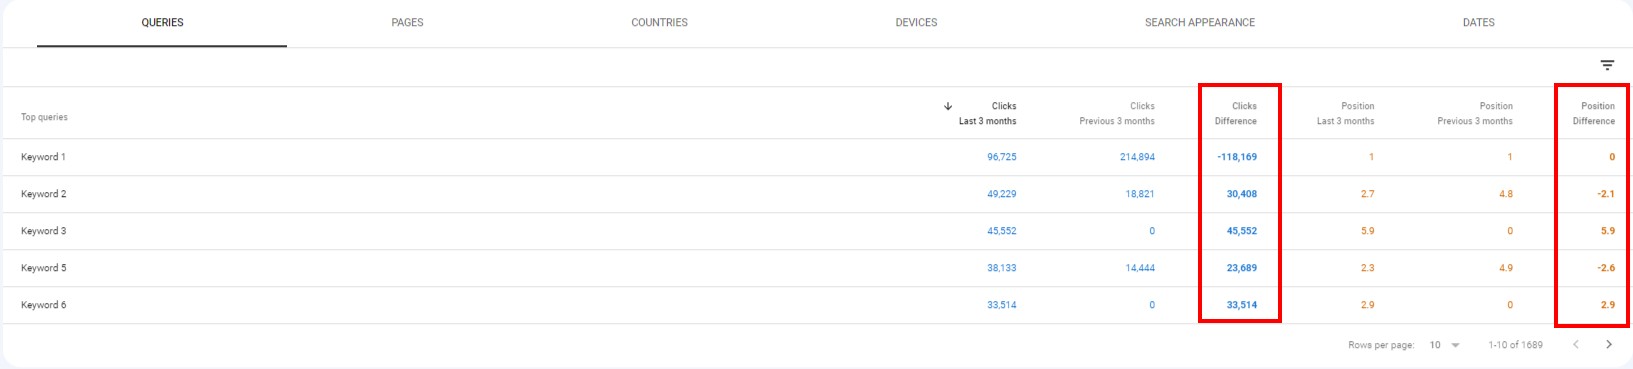
Another thing is analysis with Google Search Console. Again, GSC can be a fantastic tool to analyze your content issues.
Similar to what we showed you above, GSC also breaks down performance at the page level.
With this, you can identify pages that receive a high number of impressions but, proportionally, only a small percentage of clicks.
Why is this useful?
Impressions are similar to search volume in that they tell you how many times your page shows in Google SERPs based on user searches.
Pages with more impressions, but fewer clicks indicate that the pages are relevant for high-demand terms (often ranking 5-10), but are not as optimized to rank in the top 3 positions, where the click-through rate (CTR) would be significantly higher.
As such, these pages can typically be a goldmine for quick wins in optimization.
Design and Template
Next, look at the design of your website.
“If you want to be a Million Dollar brand, look like a Million Dollar brand”
Someone said this to me a long time ago, and it stuck because it conveys a very important psychological rule.
People buy (and trust) based on first impressions.
And I know it’s not right to judge by a first impression, but our chimp brain is designed this way.
Millions of years ago, it was used to quickly assess danger, but now it’s still present in us whether we like it or not.
You have to adapt your design to the product/service you want to sell or the niche you are in.
Don’t get me wrong – it would be overkill to change the theme as soon as you acquire a website – so please DO NOT DO THIS WITHOUT GOOD AND THOROUGH ANALYSIS.
Yet, bear in mind that there are circumstances under which you’d be better off changing your WordPress theme. Sometimes better sooner than later.
Even if that’s you, there is hope!
WordPress templates are relatively cheap and not-that-difficult to configure, so if that’s the case, you might not end up investing an arm and a leg and your firstborn to accomplish this 😉
Additionally, try to answer these questions while assessing the site design:
- Does it reflect your brand?
- Are there opportunities to give it a more modern look and feel, better suited to current trends? (With small updates!)
Consider hiring a designer or developer if necessary to help with these tasks – after all, having a great-looking website will go a long way towards making sure visitors stay on it for longer and ultimately buy from you.
Did you know?
You can subscribe to these “unlimited graphic design” companies and have all your graphic needs satisfied!
Here are some examples:
- Design Pickle – https://designpickle.com/
- Design Oye – https://designoye.com/
- Epiic – https://epiic.com/
- Perfekta – https://perfektany.com/unlimited/
WordPress Plugins
While talking about WordPress and design, we also need to mention the plugins.
WordPress is an outstanding CMS – simply the best, in my opinion – but it tends to have a plugin for even the smallest tasks.
- Ensure HTTPS?
- No problem! Plugin!
- Edit robots.txt file?
- Sure, I have a plugin for you!
- Change login logo?
- There’s a plugin for that!
- Change login URL?
- Of course, I can recommend a few plugins that do that!
- Add a CTA to blog post?
- There’s so many plugins for it!
- Add content to category page?
- I know a plugin for it!
Etc …
It can get crazy!
The downside?
Each plugin slows down your site a little bit. And the more of them you have active – the slower your site.
Makes sense, right?
So, avoiding too many plugins is a good idea.
Once we get a new website to work with, we always review the plugins and at least try to make sure it needs all of them.
As a rule of thumb, do not remove anything you don’t know or are not completely 100% sure it won’t break anything.
Check out this SEO Audit that Husky Hamster offer.
The abundance of plugins is a double-sided sword, because you don’t want too many, but they are extremely useful.
That’s why, after the initial plugin review (and purge), we usually install our plugins of choice (there are a few mentioned later in this guide).
Installing a plugin in WordPress is quick and easy.
From the dashboard, hover over plugins and then select Add New.
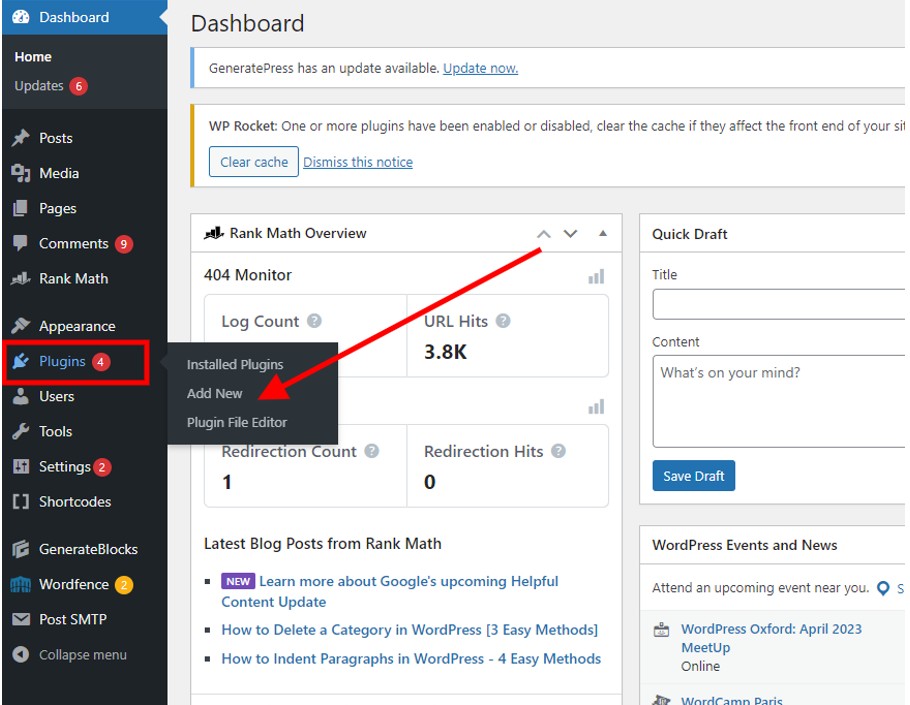
From there, there are two options.
The first is the WordPress marketplace, which we can use to search for and install a desired plugin. Simply enter a key phrase in the search bar, like “redirect”, and click the “Install Now” button.
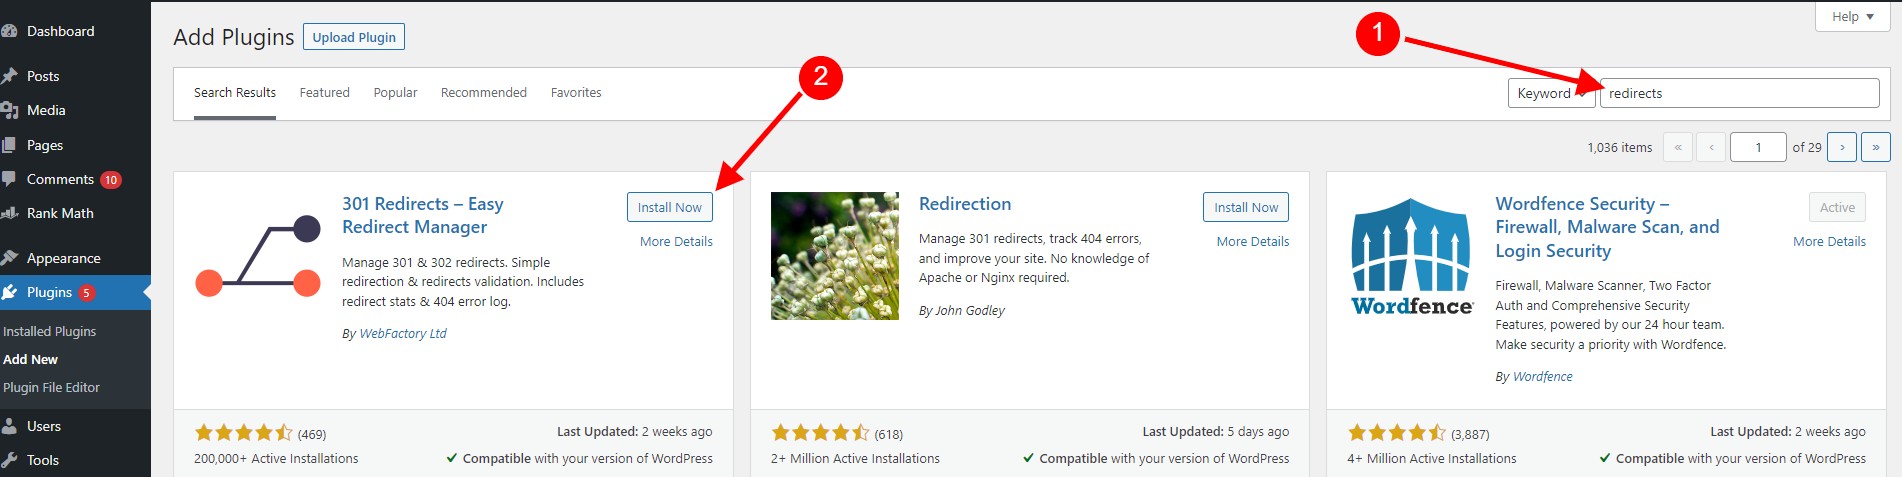
As a quick note on safety, avoid plugins with unclear descriptions, low user usage, low ratings, or those that are marked as incompatible with your version of WordPress.
This will reduce the risk of downloading malicious plugins or plugins that are susceptible to malicious attacks.
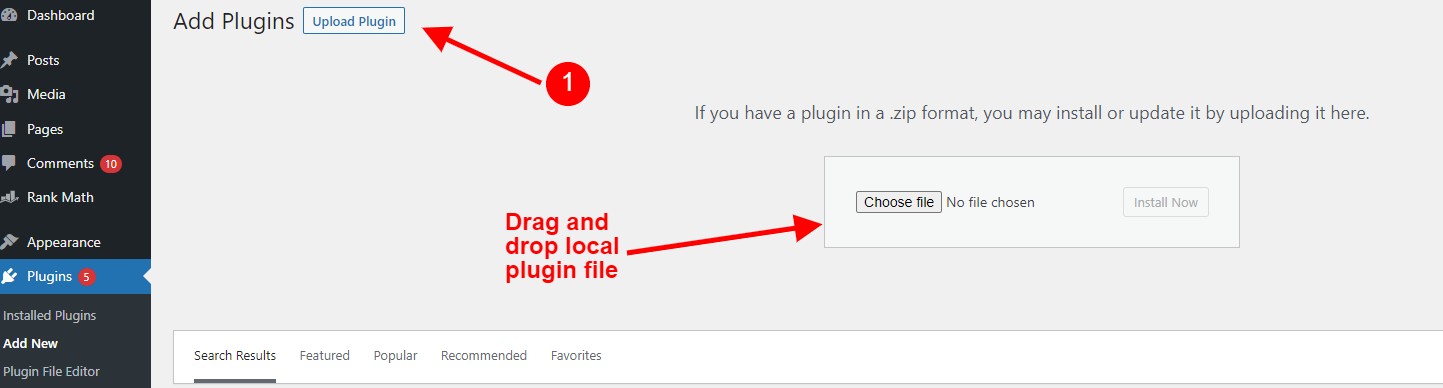
As an alternative to the marketplace, you can add a plugin manually if you have it saved as a local file.
On the same plugin page, click “Upload Plugin” at the top of, and drag or select a file from your local device.
It’s important to note that you can find most of the plugins you need on the plugin marketplace.
However, some paid plugins, like WP Rocket, need to be installed manually.
Last, but not least, try to keep your plugins up-to-date.
As amazing as it is, WordPress is an open-source system, and a lot of malicious people are looking at its code to try to hack it.
Keeping it updated lowers the risk that someone will gain unauthorized access to your website and mess something up.
Page Speed & Uptime
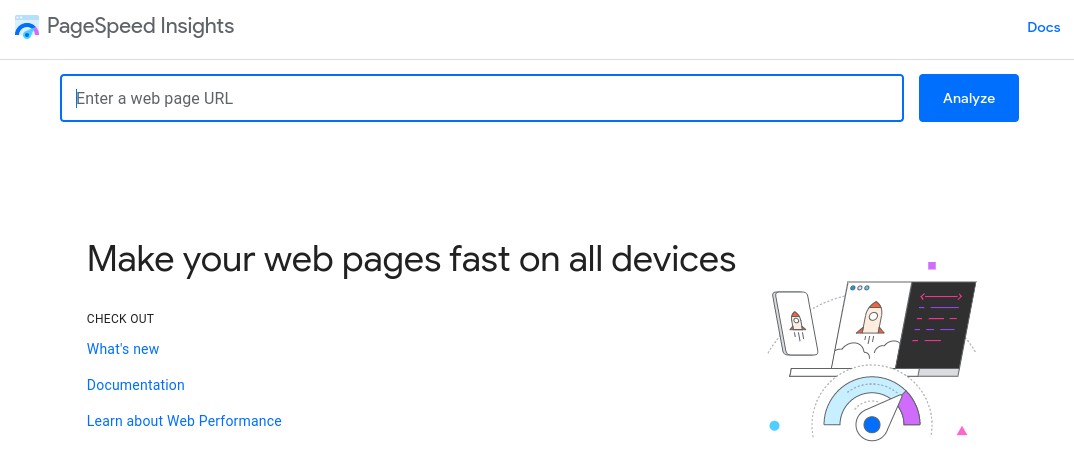
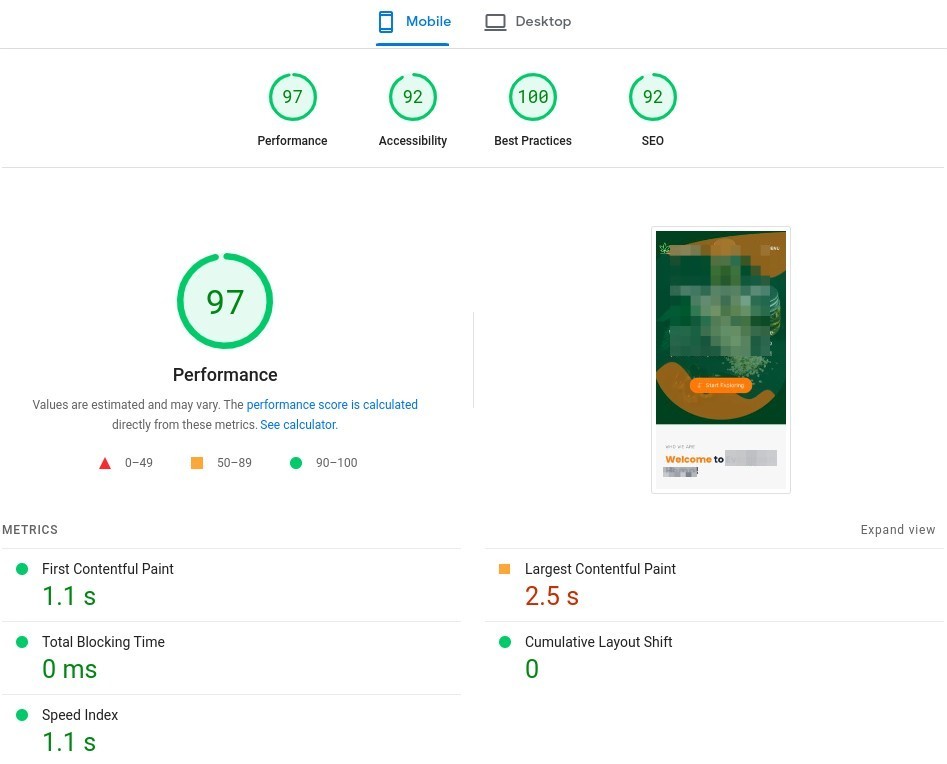
Finally, assess how well your website is performing by testing its speed and uptime using tools like PageSpeed Insights.
This will make sure that people can get to your site quickly and won’t have to wait because of slow loading times or server crashes.
You can do it, by simply visiting https://pagespeed.web.dev/ and pasting your URL:
After a brief moment, the tool will show you the main metrics for the mobile and desktop versions of the site.
First comes the Core Web Vitals (CWV) assessment:
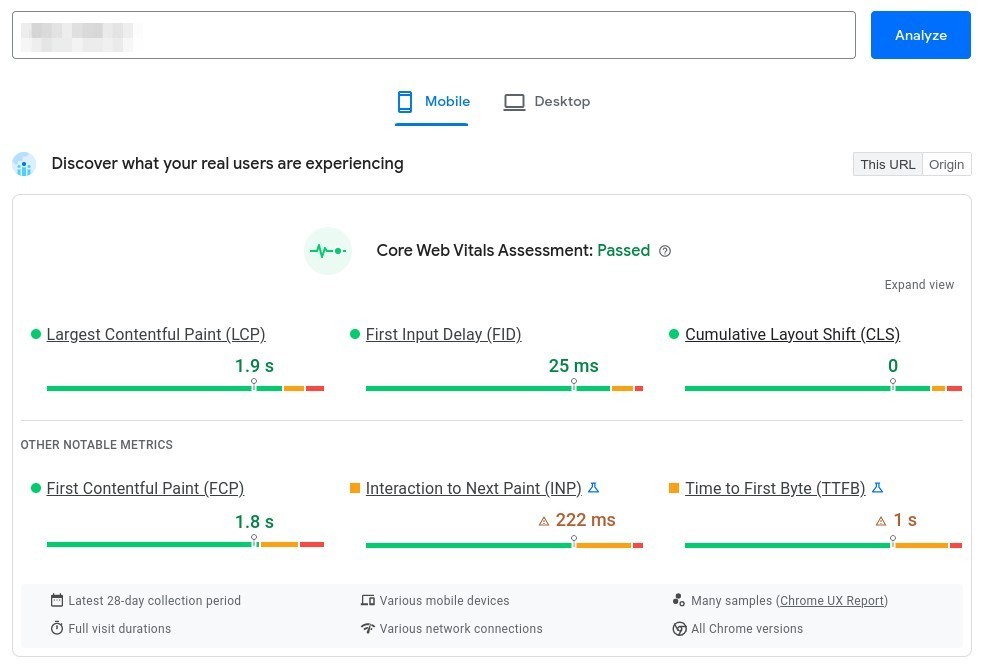
You definitely want to PASS this test!
Then you’ll see the performance breakdown:
The greener, the better!
Lastly, you want to look at the Opportunities and Diagnostics sections:
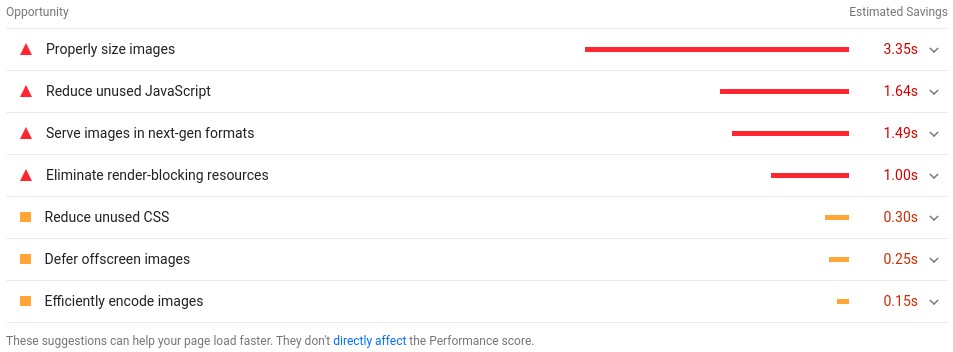
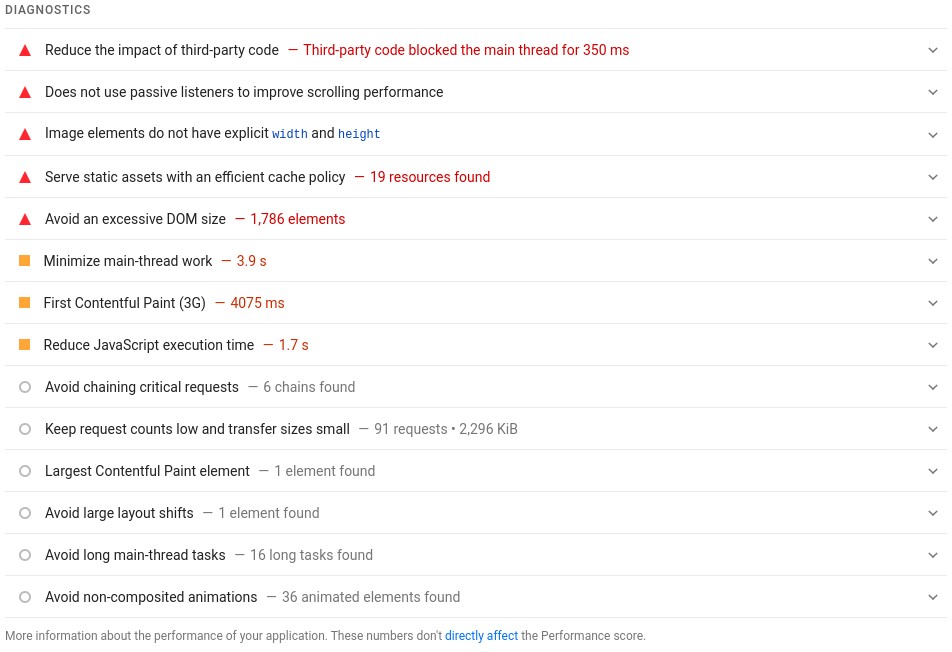
The fewer issues you have highlighted here, the better.
These sections are perfect to give you an idea of what you should focus on fixing next.
Other than the user’s convenience, Pagespeed is Google’s ranking factor! We cover it a bit later in the article.
Monitoring website uptime can be achieved with tools like the aptly named Uptime, which can be used to keep track of daily & hourly server responses.
Basic set up is easy, as it simply requires creating an account and adding a website for tracking.
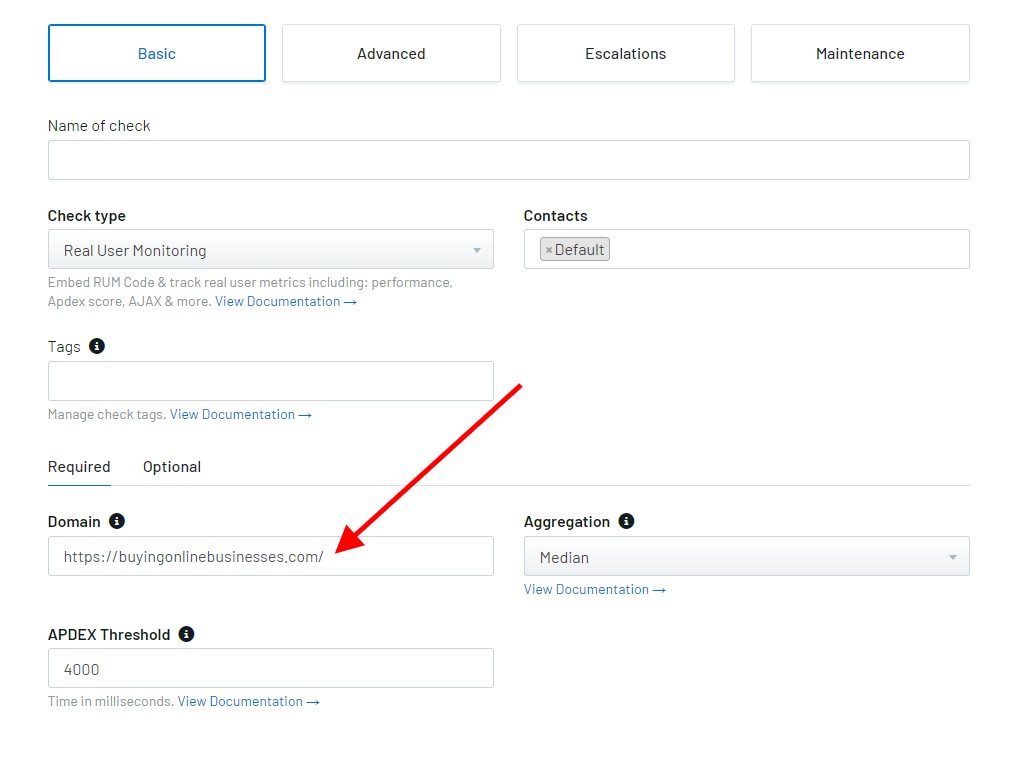
To do so, simply select “Real User Monitoring” and select “Add New”.
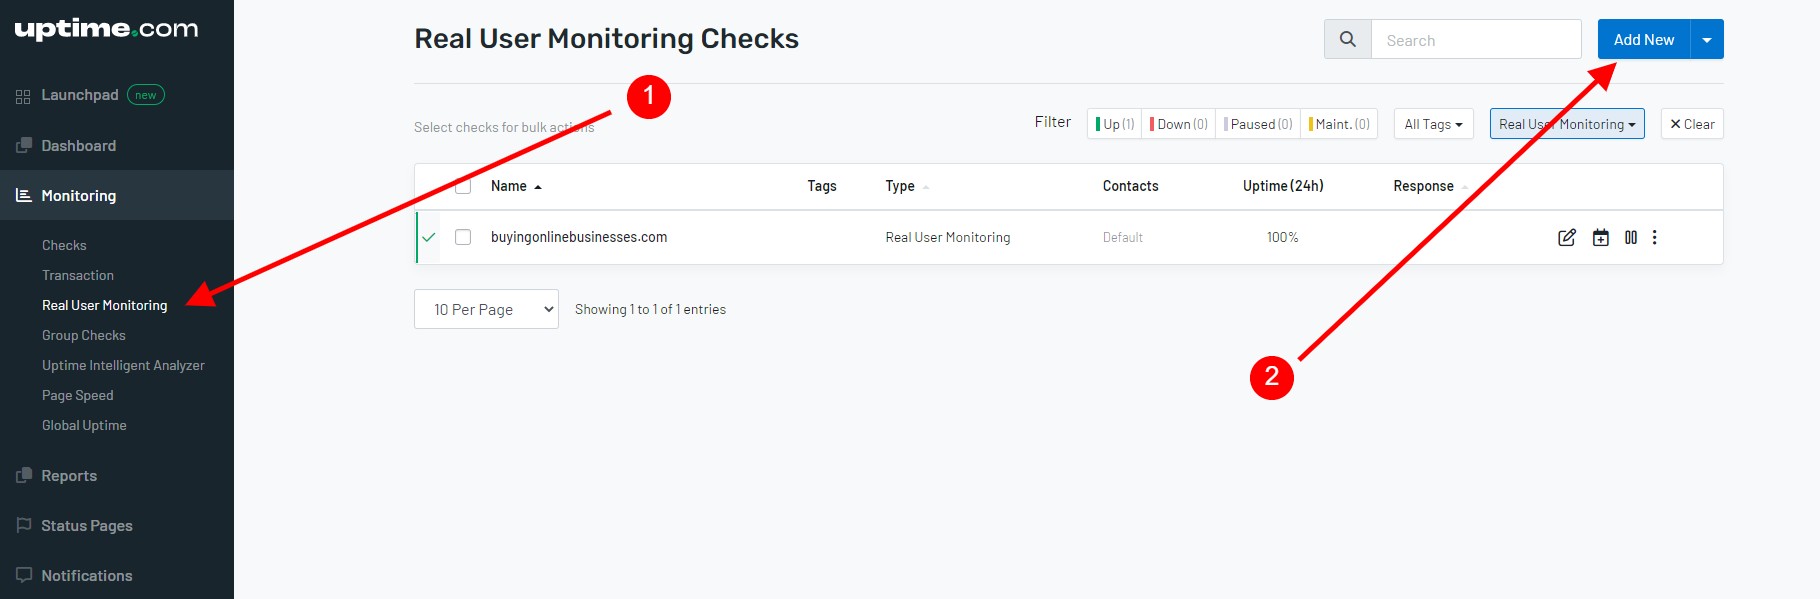
From there, add your full domain address.
One key feature that I would strongly recommend is the escalation option.
This allows you to receive and customize alerts if your website is down for a particular duration of time.
I would recommend setting it to 5 minutes or more.
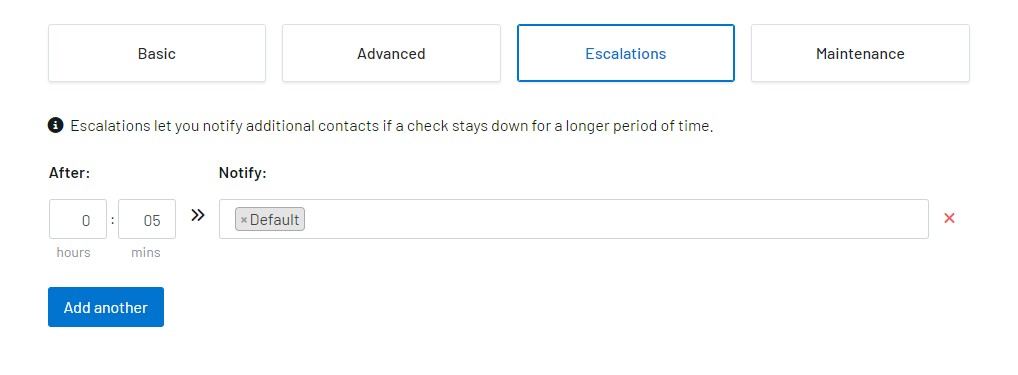
(Notify “default” means notifying the email account holder)
Once you’ve gathered this information about your new website, we can use it as the foundation for taking action.
So, let’s dive into the real deal!
2. Technical SEO
This part is a real paradox.
On one hand, it might just be the most complicated part of SEO, depending on what issues you have to face.
On the other hand, once you fix the technical SEO, you usually don’t have to revisit it for a while (sometimes forever).
At least not until something else gets broken.
Or a developer does a sloppy job.
This is why you should do all the dev work and implementations always with SEO in mind. Or, at least, while consulting an SEO specialist.
On yet, another (third? 😅), hand, it is the most fundamental part of SEO.
I mean, would you want to ride in a car with broken electrical parts?
Or live in a house with completely messed up plumbing and wiring systems?
So, you know it’s important to get it right.
I get Husky Hamster to do the SEO Audits on mine and my clients websites.
But, like with everything else, prioritization is crucial in making business decisions, so let’s go over the tech stuff by priority.
Technical Stoppers
Before you can really get started with optimizing your website, you’ll need to resolve some of the technical issues that may be holding it back.
Look for any broken links, missing or incorrect heading tags, or incomplete pages and fix them as soon as possible to ensure your website is running smoothly.
Using a Crawler
Sitebulb is a fantastic tool to help with this because it has an intuitive layout and a detailed breakdown of technical issues.
Frankly, people love Sitebulb:
I gotta admit, I’m practically in love with @sitebulb <3
— Rad Paluszak 🎨 Technical SEO Artist (@radpaluszak) May 6, 2022
There are days that we spend more time together than I spend with literally anyone else!
😉😘 pic.twitter.com/vUcnVLT1cs
Sitebulb’s documentation provides detailed guides for getting you set up for your first crawl.
However, something I would recommend turning on, that is not on by default, are:
- validating structured data
- and adding an XML sitemap as a URL source.
These can be found in the “Audit Settings” and “Crawl Sources” during setup.

Even though neither structured data nor your XML sitemap are ranking factors, they are a strong signal for helping Google understand and crawl your website.
Once a crawl has finished, you will see a dashboard with a breakdown of the technical health of the website.
For the purposes of SEO, we can focus more heavily on the “SEO Score” in the middle.
When we click “View Hints Triggered,” we see a list of issues in order of how important they are, from most important to least important.
This lets us focus on the most impactful things first.
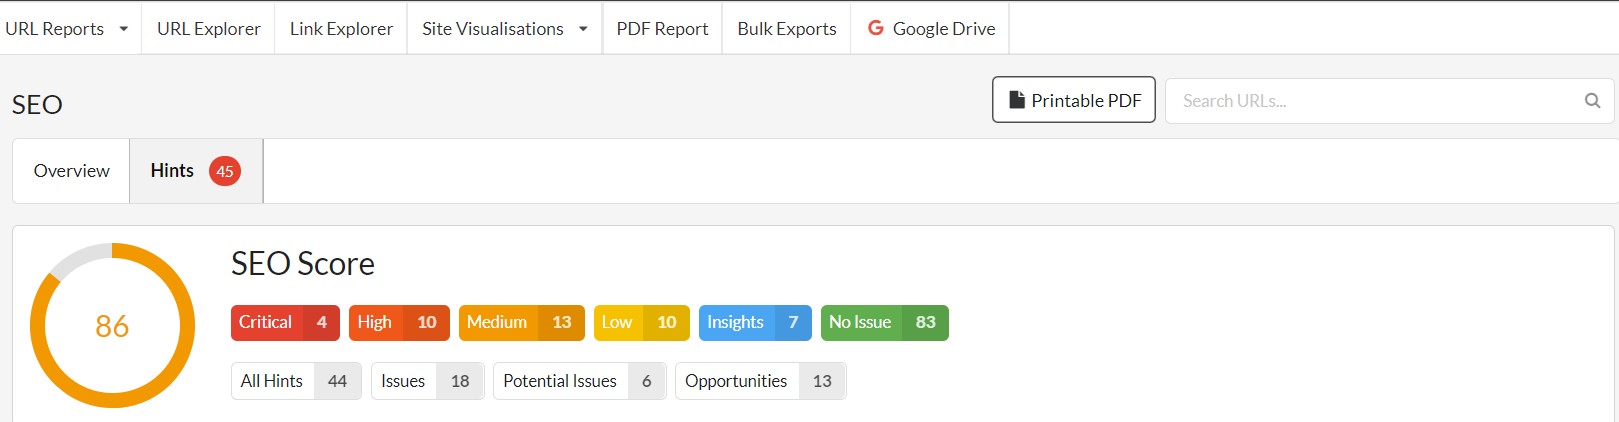
Sitebulb tells you in a few words what each issue is and gives you the option to export URLs that are affected by the issue.
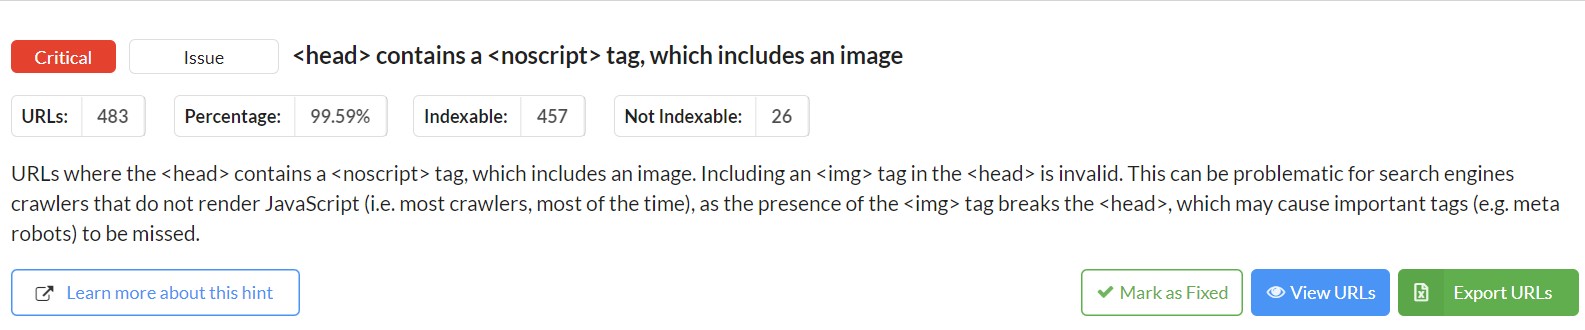
This makes finding and resolving issues significantly easier compared to similar tools, like Screaming Frog, where more manual data manipulation is needed to find errors.
If you’re planning on making any changes to the website, such as adding new plugins, digging in HTML code, or altering CSS stylesheets, do so with caution.
If you aren’t familiar with coding languages like HTML or CSS, it’s better to leave these types of changes to the professionals.
Otherwise, you run the risk of breaking your website and causing rendering issues that may take a while to fix.
Onsite Audits can be easily done by Husky Hamster.
Index Management
The second most common technical SEO issue that your site is likely to have are indexability problems.
What are indexability issues? Let’s start from the beginning.
Google needs to somehow find out about your content, and it does it through these stages:
- Crawling – this is when Google discovers the content.
What’s important is to allow Googlebot to have access to your website and content, but only the content that is useful for the user and search engine bot.
- Indexing – this is when Google stores, categorizes and processes content.
If something is not in Google’s index, then it cannot be found in Google search – it’s like it did not exist!
- Rendering – this is when Google combines the code and all visual elements for each page to (virtually) “see” 👀 how it looks.
This stage is especially important for images and dynamic content.
As this step is resource consuming, Google often skips it temporarily (I think the correct term is “queueing”), goes to the Calculating stage, and comes back when it has more resources available.
- Calculating – this is when Google crunches what it found and indexed through its algorithms. The outcome of it is your position.
As you can see, Google does a lot of work, but an SEO’s job is to make each of these steps as easy as possible for the search engine.
So, again, what does it mean that you have indexation issues?
For example, your site allows Google to crawl and index stuff that is not useful for search engines.
This could be color variants of your products or quotes that happen to be individual pages on your WordPress site.
For a quick idea if those apply to you, the “site:” search is useful to find these issues.
This can be performed by stripping out the protocol and any subdomains to see all pages associated with your domain.
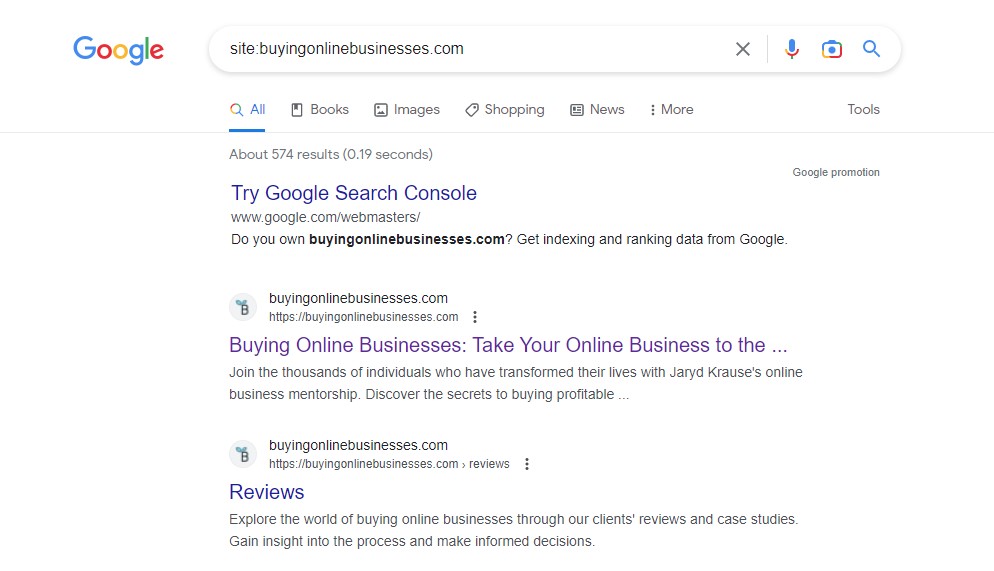
Browse the list of pages, making sure to review any standout URLs.
This can include:
- Pages with unoptimized/missing or strange titles or descriptions.
- Unknown pages.
- Pages that have thin content.
- Subdomains that should not be visible
- Pages with query strings in their URLs
Pro Tip: When doing a site search, click on the last page of the SERPs and review if an omission message appears like this:

Google tends to hide pages that don’t do well in its index, but you can see more of them if you choose “repeat the search with the omitted results included.“
If this message does not appear, then it can be a good hint that your primary index is relatively clean.
Also at this stage, make sure to review Google Search Console issues, including redirect, coverage, indexability, and canonical issues.
Resolving these will also help with indexation problems.
Google Search Console is more accurate than the “site:” search.
However, it will only give you a sample of the affected URLs, not all of them.
The good news is that the sample is usually large enough to let you figure out the cause of the problem.
In most cases, Google Search Console shows you only a sample of the affected URLs. Nonetheless, this should be enough to identify the root of the issue.
We can review indexation issues in the Indexation → Pages tab of Google Search Console.
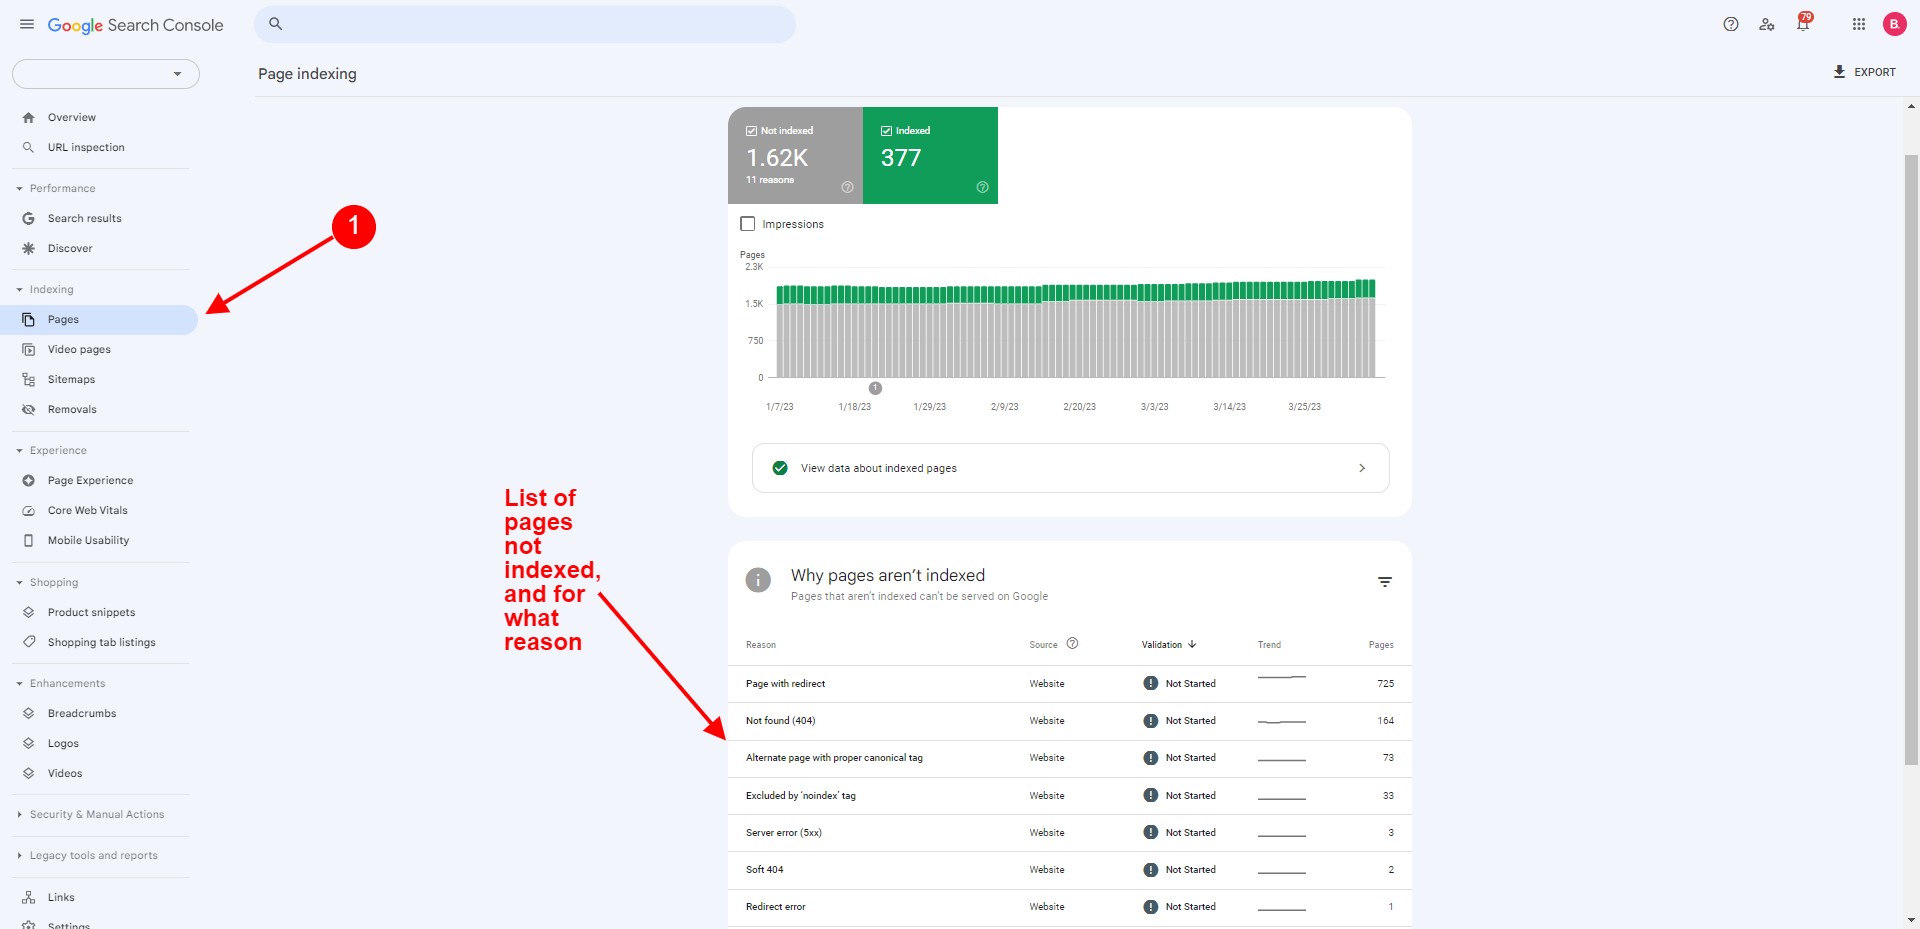
From there, we get a breakdown of URLs that are not indexed and for what reason.
It’s worth noting that just because a URL is listed here, this is not by definition an error.
For example, the “Excluded by ‘noindex’ tag” tab lists pages that contain a…
You guessed it! Noindex tag.
There may be good reasons why this was added, like a page being a low-value page, or a private page that you don’t want to appear in the SERPs (like a login).
As such, this section should be reviewed in the context of making sure that key, indexable pages are not included in this list for any of the specified reasons listed.
Discover how to fix your Google Search Console and technical SEO issues with this onsite audit.
Videos About SEO:


Technical Must Have’s
As you can deduce from the above, there could be a lot of technical issues that block you from ranking well:
- Noindex tag.
- Robots.txt.
- Canonical.
- Hreflang.
- Slow website.
- Redirects.
- Javascript.
A LOT.
You should pull out all the stops, but after all, there are also some things that should always be done.
That’s why I’ll give you two quick fixes that are almost always applicable.
They may also have a big impact on the site’s performance because you implement them across the whole website (not on individual pages).
And they don’t take much time at all.
That’s what I call good leverage.
PageSpeed Optimisation
Before I jump into this, let me just say that most of the pet websites we build and run are based on the GeneratePress theme.
According to some tests, GeneratePress is among the fastest WordPress themes available.
Why is this disclaimer important?
Well, the PageSpeed on these sites is pretty good out-of-the-box. Usually, in ranges of 80+.
With that in mind, the initial score you’re going to see later is already pretty high.
On one hand, it’s great to have a good score to start with, because you don’t have to worry about this aspect that much.
On the other hand, you have a difficult task in front of you, because the higher you get, the more difficult it is to improve the score.
It is because the nuances near the top score are getting more intricate and often harder to solve.
Now, let’s do some optimization!
My go-to optimization plugin is WP Rocket (this is not an affiliate link, but you get a 20% discount on all plans by using it).
Here’s how to configure it:
1. After creating a WP Rocket account, go to https://wp-rocket.me/account/ and download the zip file with the plugin.
It’s at the end of the menu:

2. Upload the plugin through WordPress → Plugins → Add New → Upload

Refer to the section ‘WordPress Plugins’ above in case you need a more detailed description.
3. Once it’s installed, you need to configure it.
For the purpose of this exercise, we only use the most basic settings:
- File optimizations
- Minify CSS
- Optimise CSS delivery
- Minify JavaScript files
- Load JavaScript deferred
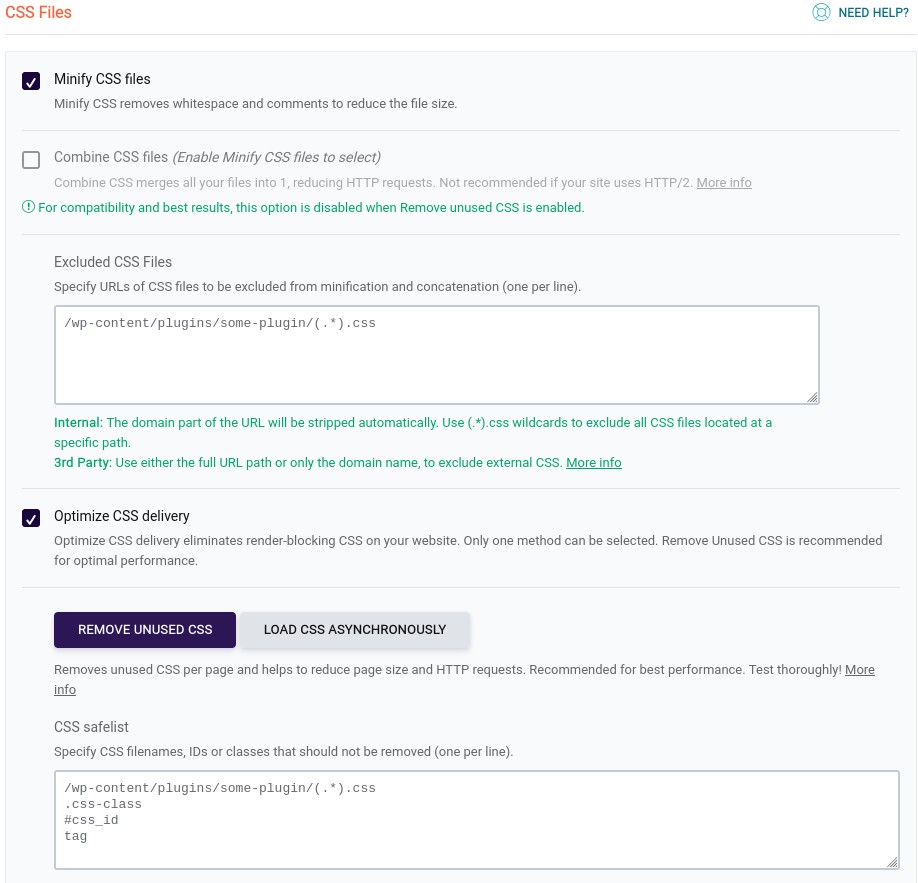
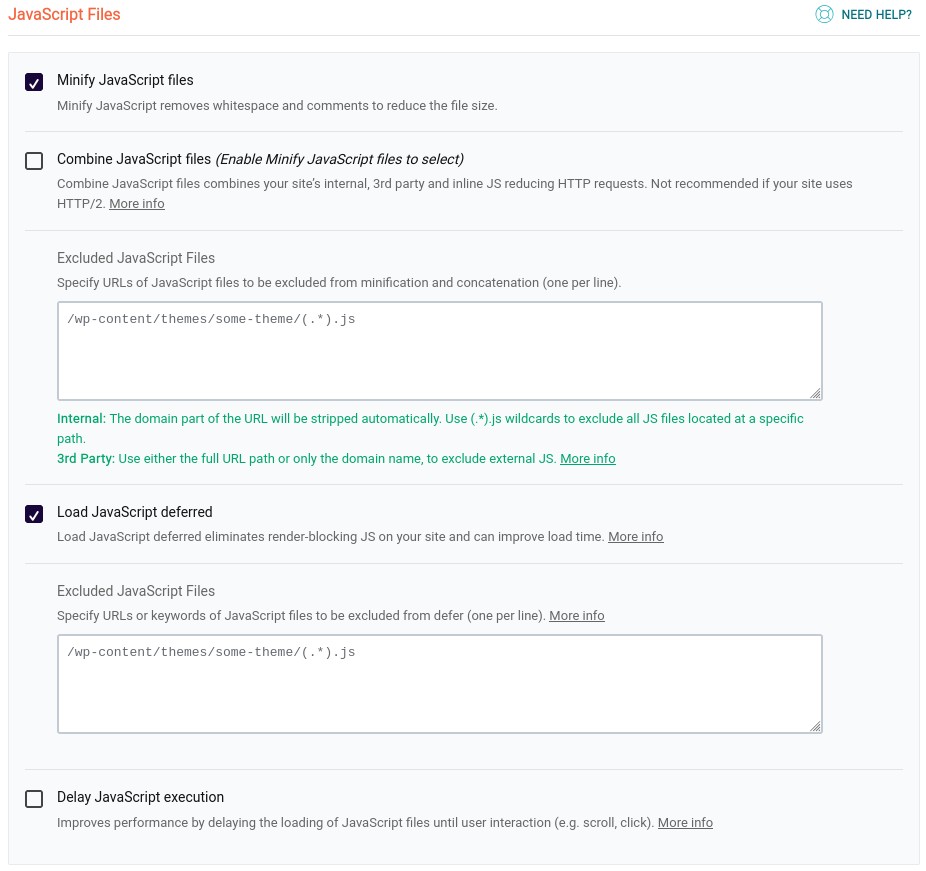
While optimizing CSS and JS be careful, as you might break things. All potentially breaking changes will show you a warning like this:

What I do is, for every change I make, I save it and test the website in browser’s incognito mode. This is to test if everything works as it’s supposed to, and I didn’t break anything.
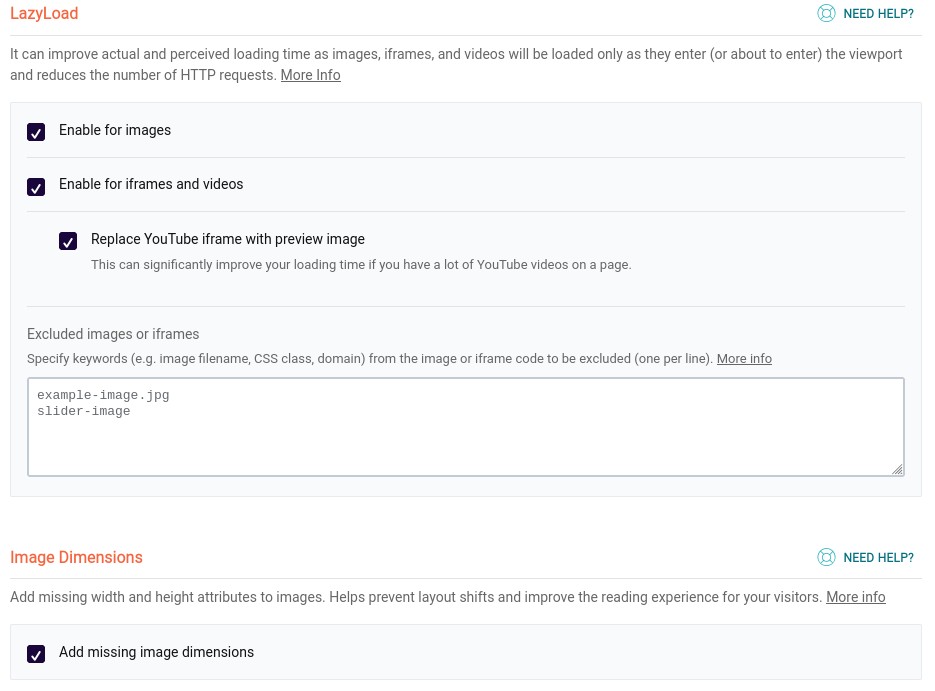
- Media
- Enable for images
- Enable for iframes and videos
- Replace YouTube iframe with preview image
- Add missing image dimensions
BEFORE (website NOT on GeneratePress):
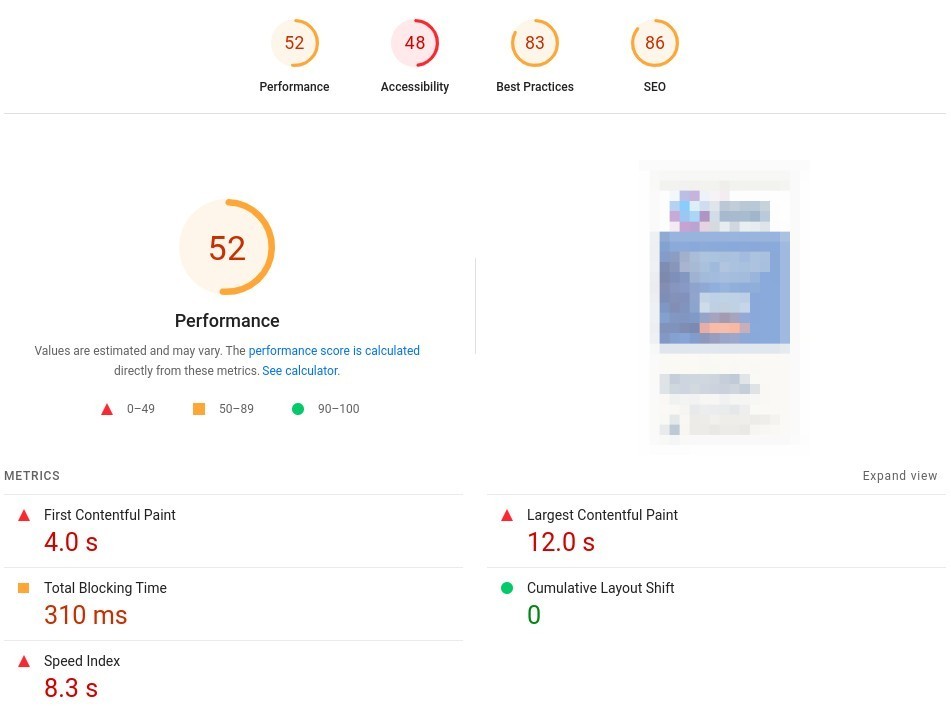
AFTER (website NOT on GeneratePress):

BEFORE (website on GeneratePress):
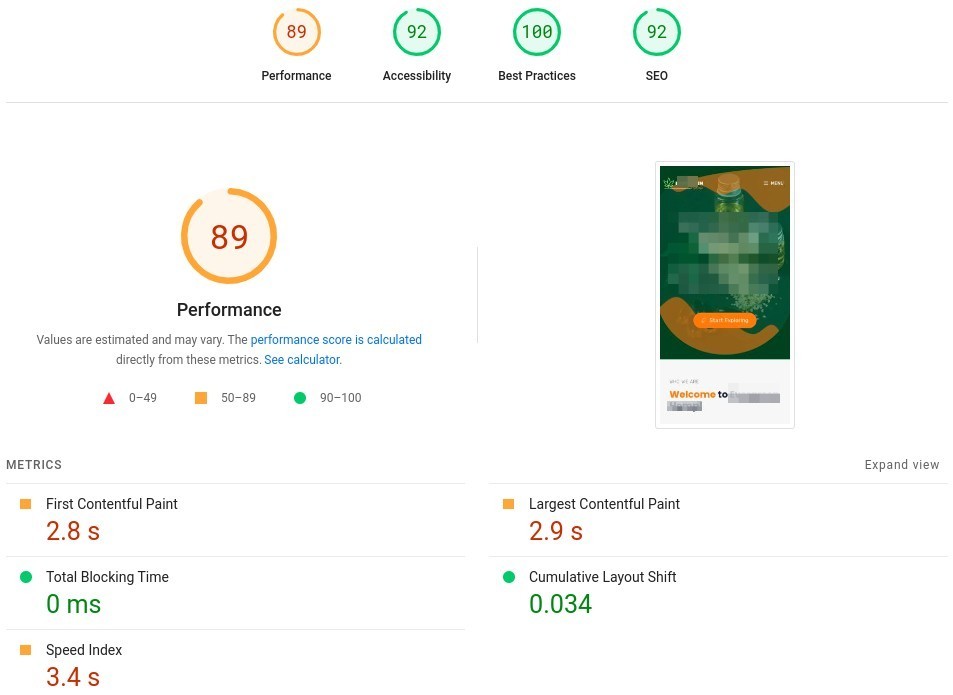
AFTER (website on GeneratePress):

As you can see, you can increase the score here significantly, and on an already high-end performance, by just running with the most basic settings.
Let’s continue and see what we can get if we push the optimization a little more.
Image Optimization
My go-to plugin (and probably the best image optimization tool in the world) is ShortPixel.
Once you install it, you can request a free API key.
The free account allows you to reduce the sizes of 100 images and thumbnails per month.
The plugin has many options, but even using the default settings, you can save a lot of space and optimize the images very well.
Let me emphasize that:
I usually run ShortPixel with the default settings, and it gives me outstanding results.
After going to Media → Bulk ShortPixel → Start optimizing, you are just a few steps away from having all your uploaded images optimized.
For first time optimization, I recommend just using the defaults on that screen.
Once the process starts, just leave the tab open and check the progress from time to time:
As the optimization process continues, you can see the versions of the image before and after processing:
Once everything is finished, you’ll see a short summary:
The example here shows an already well-optimized website that was just missing the image optimization.
BEFORE (website NOT on GeneratePress):
AFTER (website NOT on GeneratePress):
Not bad for less than 10 minutes of work!
BEFORE (website on GeneratePress):
AFTER (website on GeneratePress):
And there were no more optimization opportunities left in the PageSpeed report after the bulk processing, meaning that everything was sorted out.
Not too bad at all 😉
Good-to-Have Technical Fixes
As we’ve mentioned this before in the context of plugins, it’s good to keep the whole website updated. This includes:
- Plugins
- Themes
- WordPress (or other CMS’) core.
If the website was built with old software or coding languages, you may sometimes have trouble installing updates or adding new features because they won’t work together.
This can cause errors or slow down the site, so check the current version and look for any possible compatibility problems before moving forward.
Other than that, a very useful tool, especially for websites targeting more countries, is a CDN.
The Content Delivery Network (CDN) adds a caching layer to your website and keeps the cache “at the edge” between your server and the DNS.
Then, whenever possible, it serves the content (code, images, JS or CSS files, etc.) to the visitors at blazing speed.
Technicalities aside, it means that if CDN made a copy of your content at its super-fast servers, the visitor gets a response not from your website directly, but from the copy residing at one of many CDN servers (usually the closest).
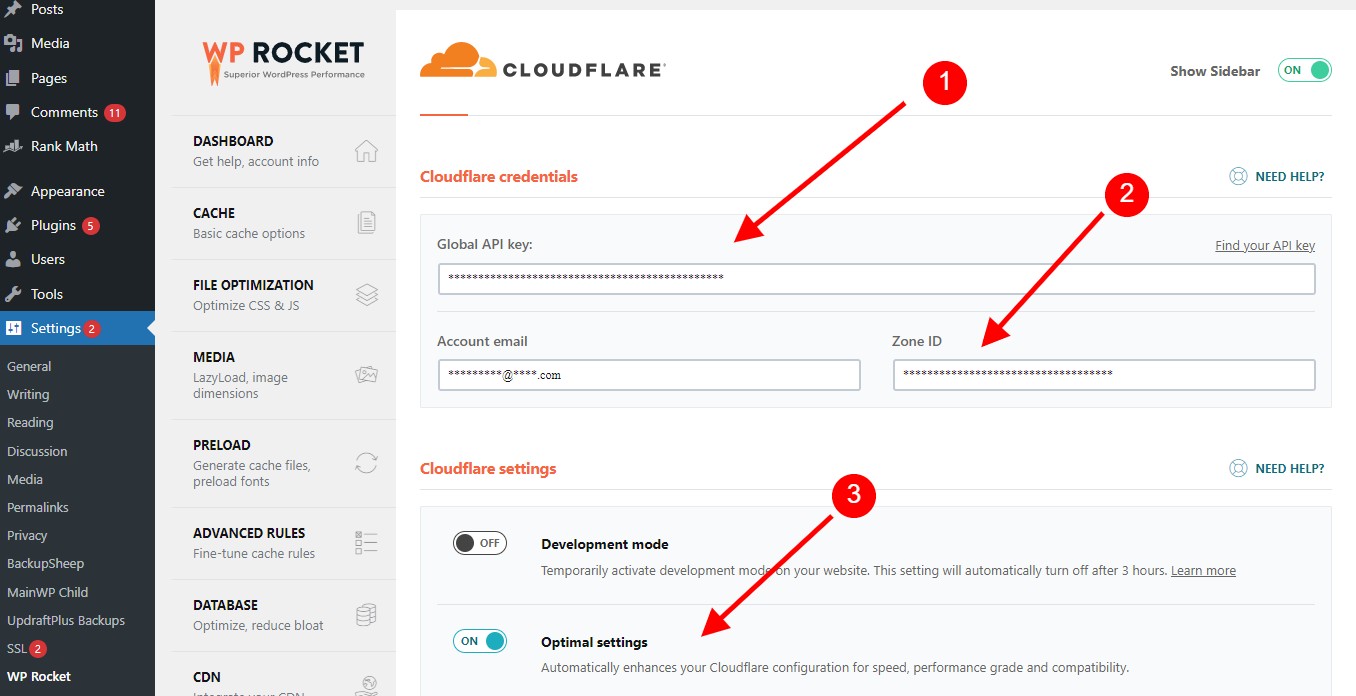
Cloudflare’s CDN is my favorite option for speed optimization, both due to its features, ease of use, and compatibility with WordPress plugins.
An example of this is its integration with the aforementioned WP Rocket.
It lets you use your Cloudflare API key to connect to your account and set up the best settings automatically.
One last good-to-have, which might not really be directly related to SEO, is to have a backup of your site.
Just as it’s useful (also for SEO!) to monitor if your website is working properly – as we said earlier – site’s backup gives you some peace of mind.
Additionally, if anything goes awry, you can revert to your latest backup and forget about the issue as if it never happened.
3. Content
Content is the backbone of any successful website, so it’s crucial to make sure yours is up to scratch.
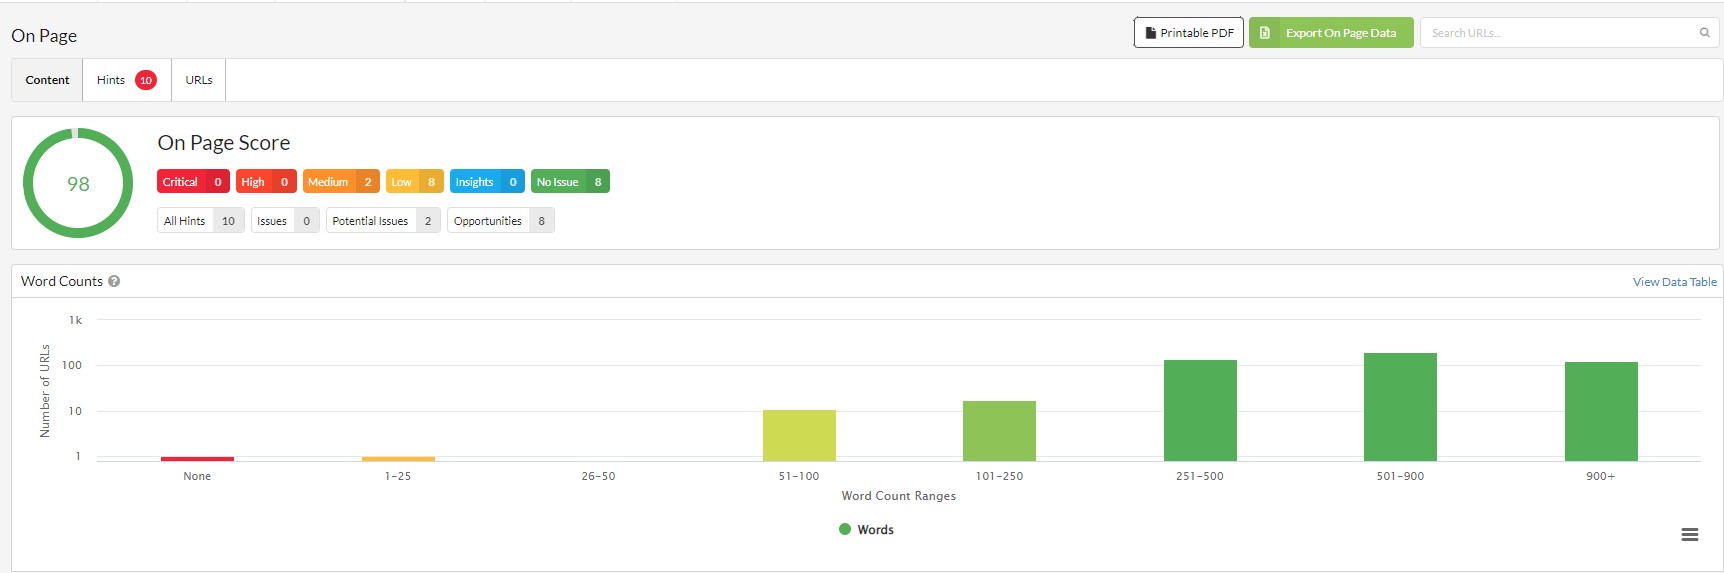
Start by taking an inventory of the existing content on your website and making a note of any areas where it can be improved or better optimized for search engines.
Sitebulb’s on-page section is a good place to start with this, as it shows users which pages have thin content, unoptimised meta titles, H1s etc.

However, this is only a base level of analysis!
To thoroughly optimize our existing content, we need to export our pages and audit them manually.
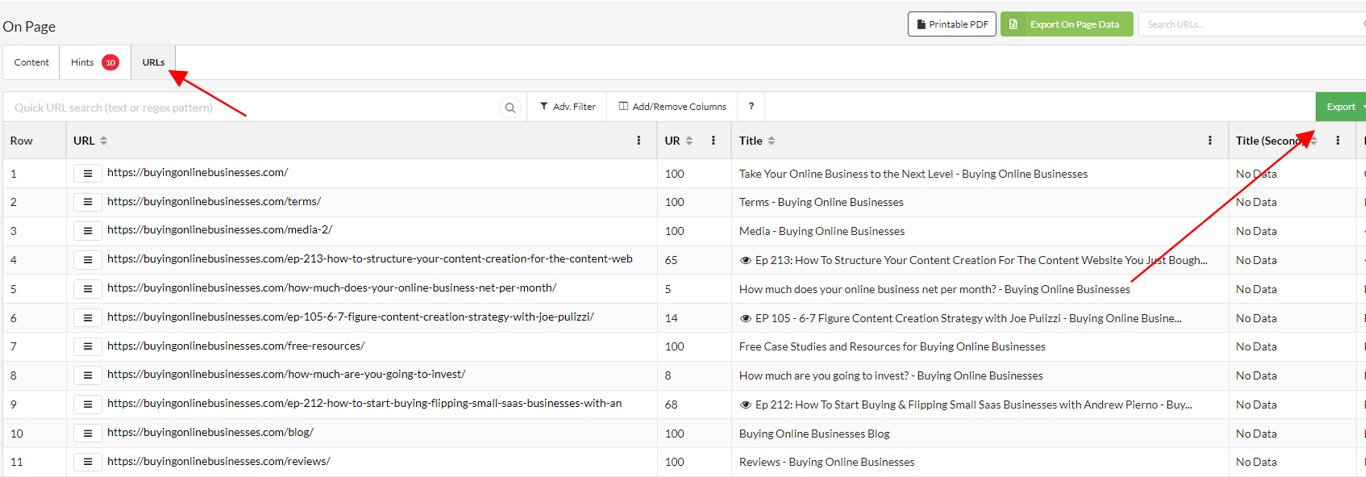
Once exported, go through each page and manually assign 1-5 keywords that have the highest search volume and that make sense to target on that page.
From here, you want to assess your competitors in the SERPs who are ranking in the top 1-3 positions for those target keywords and understand what they are doing with their content that you are not.
This can include issues like:
- More in depth content, covering topics we are not.
- Unique valuable content, like the inclusion of first-party data.
- Better optimized heading structures.
- The inclusion of rich assets, like videos, infographic and FAQs.
- Content that is more targeted to the demographic audience.
Chances are, if you review competitor pages carefully, the difference will quickly jump out.
Then, you can move on to creating fresh, relevant content that helps you boost your visibility in search engine results.
You can take a look at your competitor’s sites to see what topics are helping them rank in organic search results or where they’re falling short, leaving gaps for you to possibly fill.
Remember that any piece of content should be crafted with both humans and search engines in mind.
That means it should be clear and readable but also contain a healthy mix of keywords relevant to your industry or niche.
We use (including our members and audience) use Husky Hamster Content Creation Packages to ensure we have only the best content published on your websites.
An easy way of generating new content ideas is with ChatGPT (a new tool that no one had heard of before 😂) due to its ability to input intuitive commands known as prompts.
For example, if we wanted to grow our vegan cooking website, we could use a prompt like this.
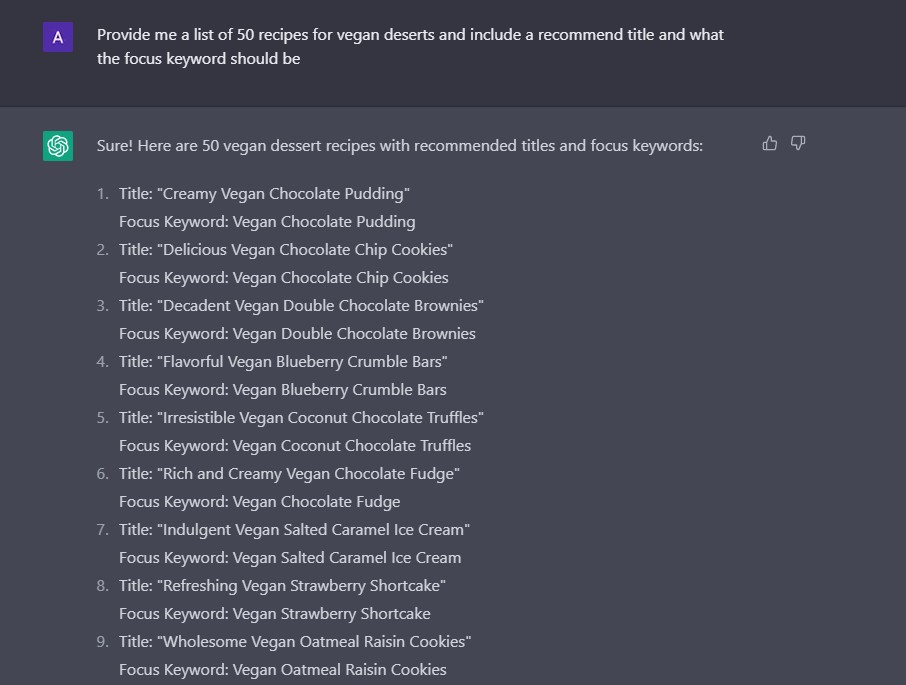
While this is great for idea generation, we don’t know if any of the listed keywords have any traction or search volume behind them.
As such, it’s important to use tools like Ahrefs to verify the search volume.
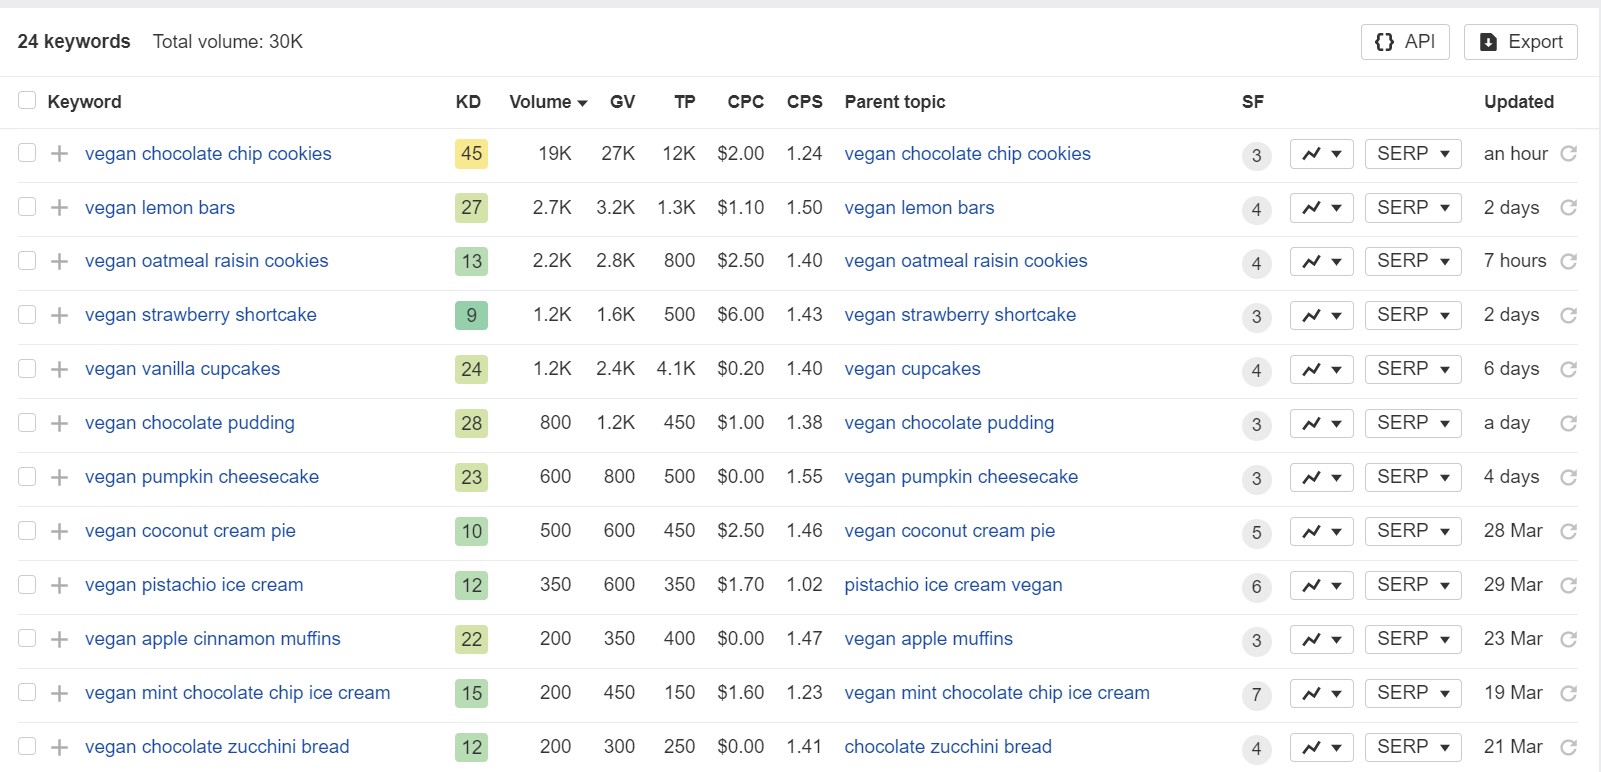
After putting our keywords through Ahrefs’ Content Explorer, we can see that only a few had a high search volume, with the rest having medium monthly searches.
Medium isn’t bad, but you can always do better, right?
We can continue to reiterate this process by asking ChatGPT for an extra 10 (or even 100) ideas and cutting down the list of examples to find golden keywords to start targeting via new content.
Semantic Clusters
No piece of content should stand alone.
Instead, it should form part of a larger network that helps build your website’s authority in the eyes of search engines and creates an engaging user experience for your visitors.
We call this concept “semantic clustering,” where related pieces of content are grouped together to signal their relevance to search engine crawlers, driving higher visibility for all associated pages within the cluster.
As you create new content, think about how it can be tied into other existing pieces on your site.
Consider linking out to similar articles or posts by other authors whenever possible – again, this is something that bots reward with higher rankings!
For example, let’s say you just created a blog post with a recipe for chocolate cake.
You could include a link to another post on your website that talks about:
- baking tips,
- the history of chocolate,
- or how to make the perfect frosting.
There’s also an alternative – quite the opposite – way to approach this.
You can create the main piece of content targeting a bigger keyword and then figure out the surrounding topics.
You can do it by using Answer The Public.
Let’s say you are targeting the keyword “cat food”.
Plug it into the tool and let it find the related keywords and topics for you:
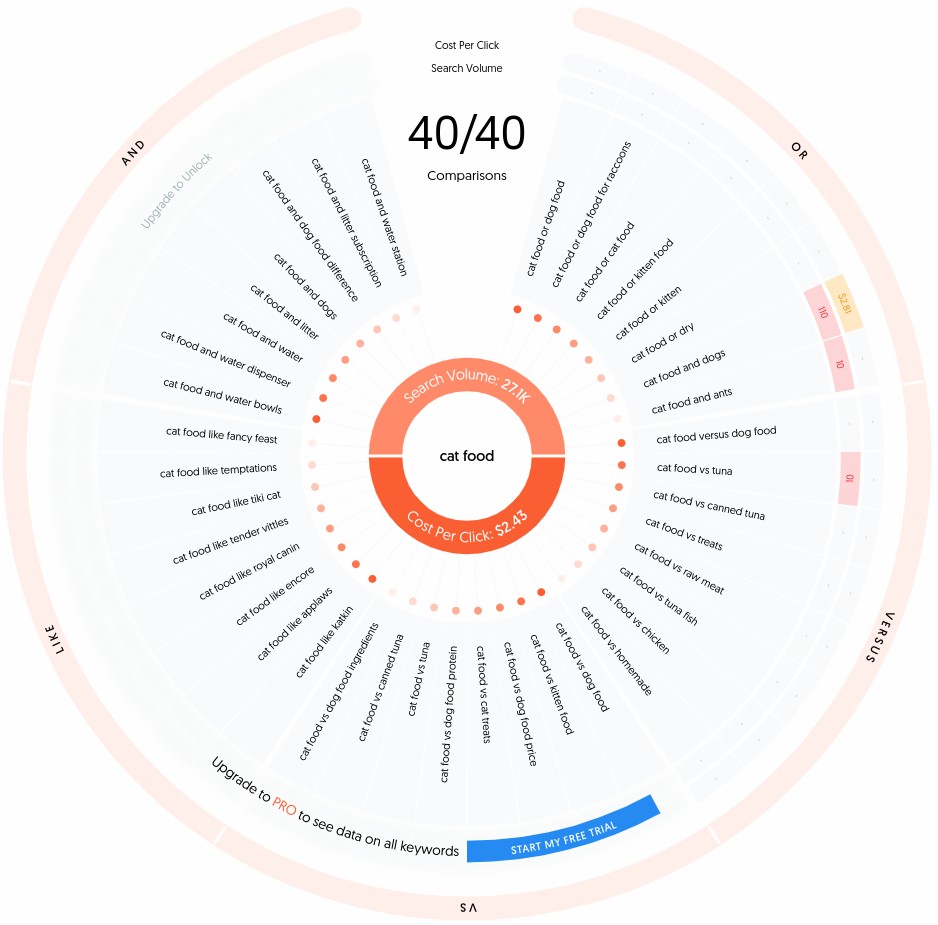
Now, create the main article “Cat Food” or “Best Cat Food”, but surround it with other articles on these topics:
- Fancy Feast Cat Food
- Cat food and litter
- Differences between cat and dog food
- Best dry cat food
- Can I feed my cat with canned tuna
- Can I feed my cat with raw chicken
- Best kitten food
- Cat ingestion – what you need to know
- Cat food recommended by vets
- Royal Canin cat food
- etc.
Make sure that each of these articles includes a link that links to the main article, “Best Cat Food”!
You can also link these secondary articles to each other. It will help with their overall semantic relevance.
Creating topical clusters helps visitors explore more of your content.
But more importantly, it tells search engine crawlers that all related posts are part of the same topic.
The search engine – being an order-and-logic-liking creature – sees them as topically and logically interconnected.
And this – don’t tell anyone 🤫 – helps you rank better!
Not Only Written Content
Remember that content isn’t just limited to written articles and blog posts!
It can also include videos, images, infographics, podcasts, and webinars.
All of these things have the potential to get people’s attention and get them to spend more time on your website.
Visual content is particularly powerful when used in combination with written words.
Images and videos can help explain complex topics quickly and clearly.
Did you know? You can effortlessly generate simple videos for your blog posts using an AI assistant with tools like Pictory or Invideo.
Infographics are a great way to show insights or statistics in an easily understandable format.
Podcasts also provide an opportunity for visitors to get a deeper understanding of your business, products, or services without having to read through lengthy pieces of text.
You can also create an audio version of your blog post; this approach is being introduced on more and more websites (even big publications like bigthink.com).
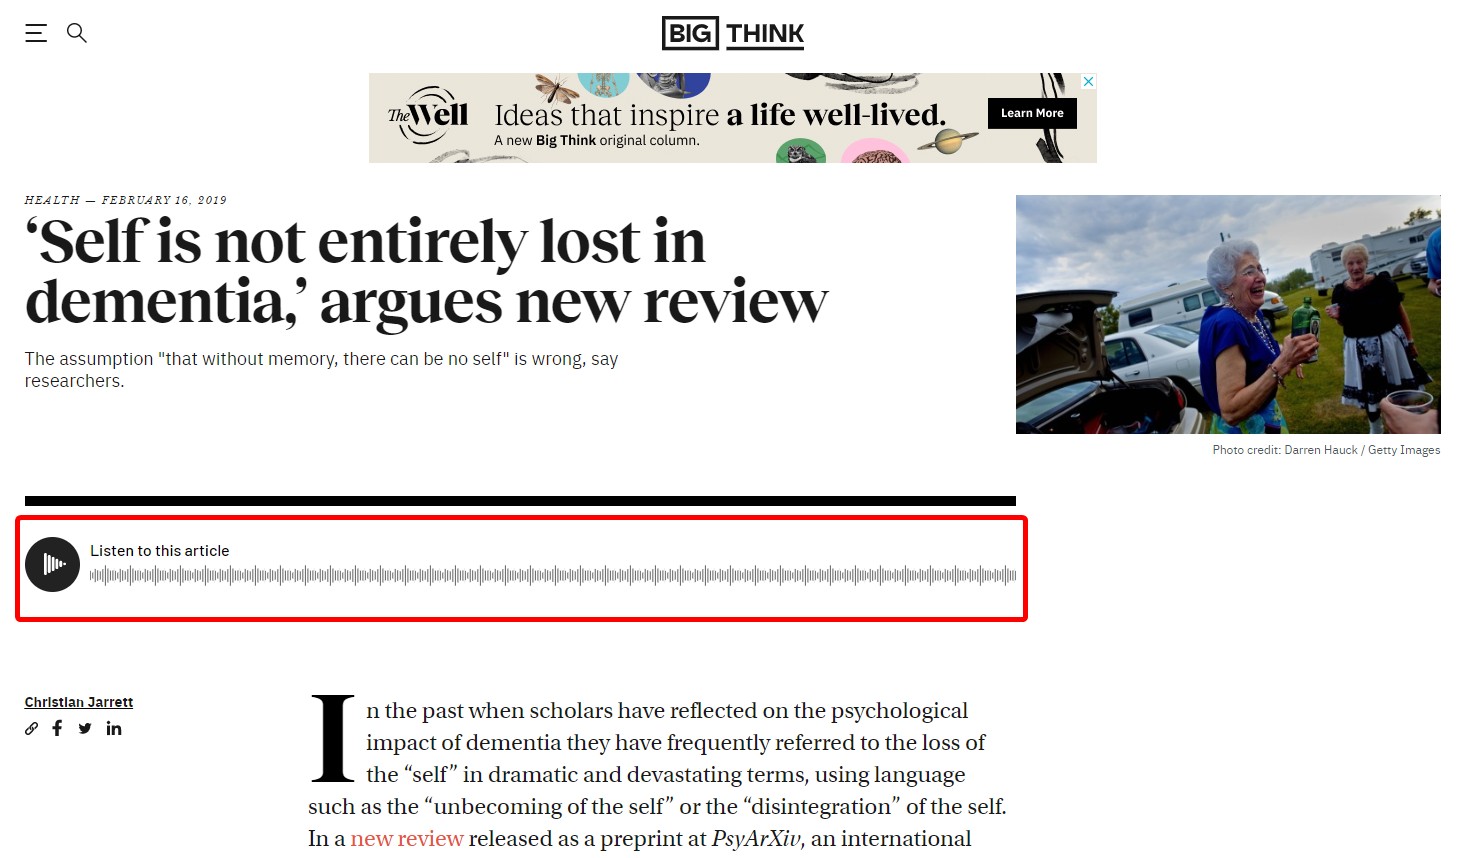
Finally, webinars give you the chance to talk directly with potential customers who may just be starting to think about buying something.
Go ahead and meet them early by creating meaningful conversations that could result in conversions down the line!
If you want help with content creation, I like and use Husky Hamster Content packages, you can check them out here.
Keywords
No SEO strategy is complete without a good keyword plan.
We talked a bit about generating content ideas with ChatGPT in the “Content” section above.
What we’re doing here is, in essence, very similar.
Yet, it focuses more on finding keywords directly (without going through tens or hundreds of generated ideas).
It also shows you a different, more technical, approach to finding these golden nuggets.
To find the best keywords for your website, use tools like Ahrefs to help you identify relevant terms with high search volume and low competition.
This will ensure you target keywords with potential while avoiding attempts at phrases that may be overused or too competitive to rank for quickly.
We can use Ahrefs to help with this by reviewing our organic keywords, as seen below.
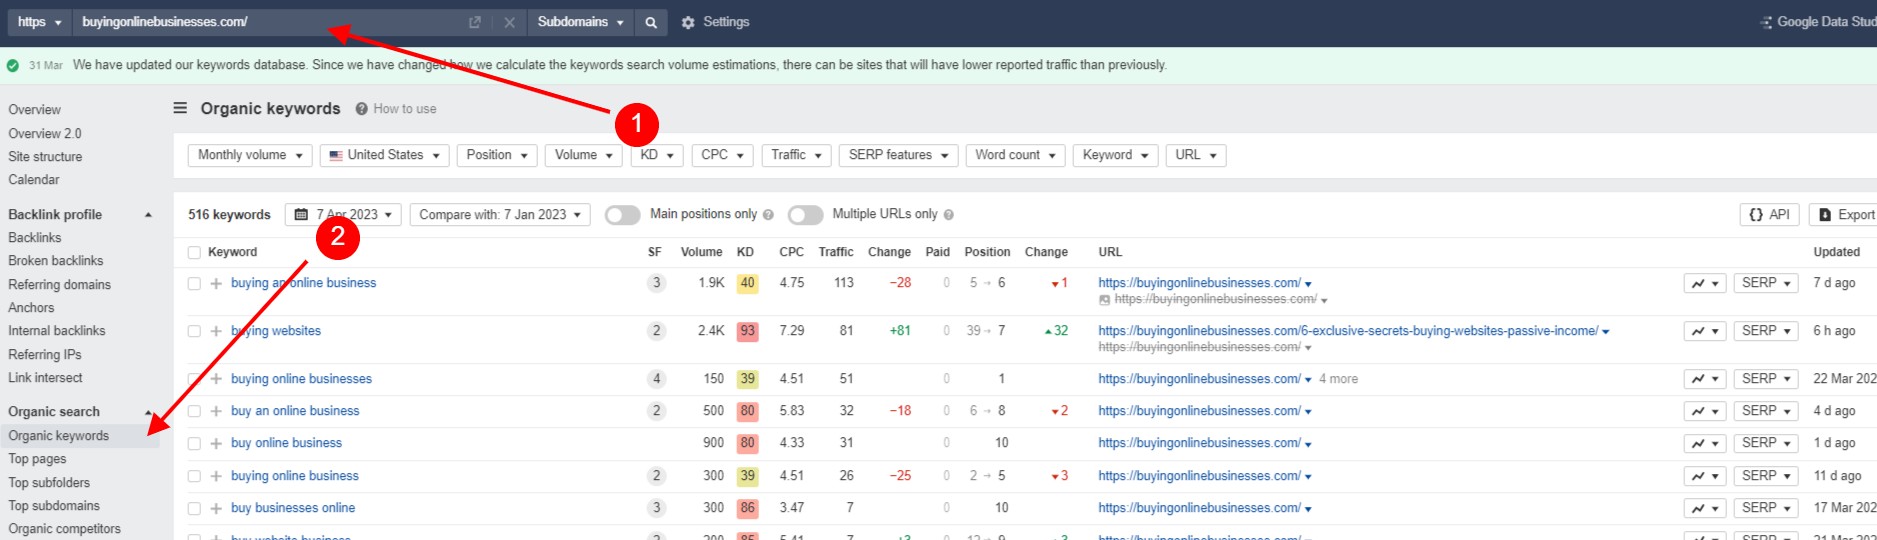
On the Organic Keywords tab, we can use the filters to customize our search to provide a realistic list of keywords we can target.
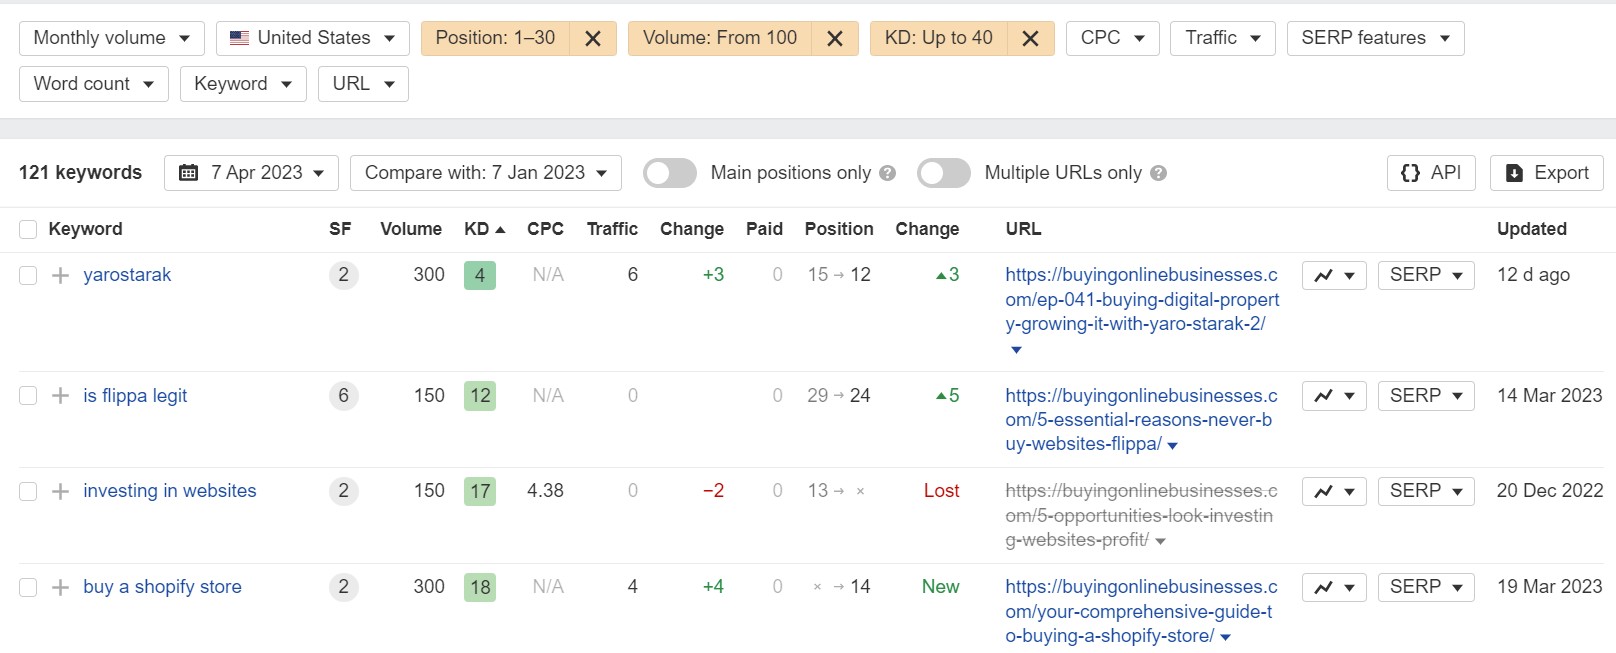
For example, in the above, I’ve set organic positioning from the 1st to the 3rd page, with search volume over 100 and keyword difficulty under 40.
This allows us to identify keywords we are ranking for that have a realistic chance of improving to gain a greater traffic share.
When you have these core words, think about how they can be used in various contexts throughout your content:
- in titles and headings,
- meta descriptions,
- page URLs,
- image alt-texts
Basically, any one of the key SEO on-page elements.
One tool that will definitely help you check if you used the keywords in your content is the RankMath WP plugin.
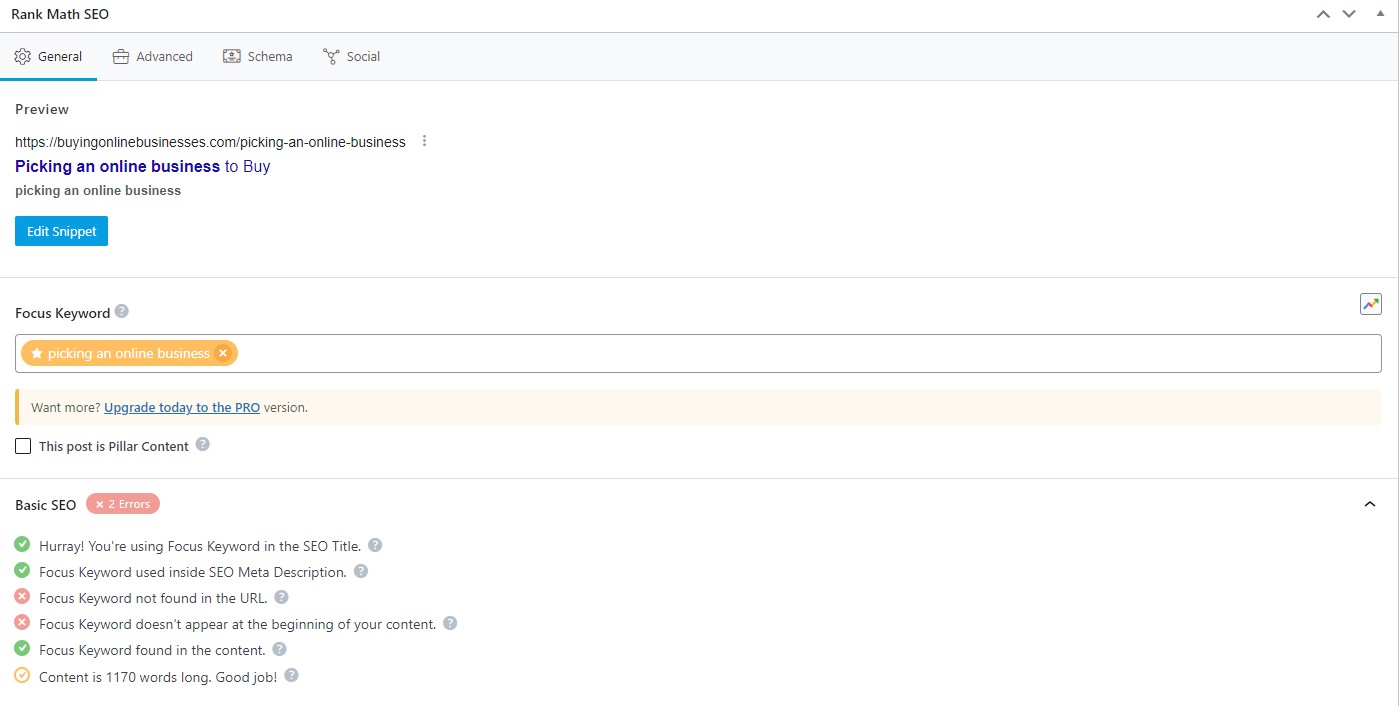
It allows you to select a focus keyword for a landing page and receive key recommendations if that page is as optimized for that keyword as it can be.
This includes things like checking keyword density and if the keyword is in the page title.
It’s worth noting that while RankMath’s recommendations can be useful, it’s important not to take them at the expense of the user experience.
For example, a page may only need to be 300 words if the topic is very short.
This may spike a warning, but after reviewing the top ranking pages for the keyword you want to target, you may notice that they, too, only have 300 words of content on a landing page.
As such, it’s important to understand that these recommendations are good baselines, but priority should always be given to optimizing content in a human-centric way.
Sidenote: If you’re taking recommendations, I think RankMath is the best SEO plugin for WordPress!
Also remember to avoid keyword stuffing, as this could harm your rankings rather than help them soar.
And don’t forget about long-tail keywords either – these are longer phrases that people might type into search engines when looking for something specific (e.g., “vegan and gluten-free chocolate cake recipe”).
They tend to bring higher conversion rates since visitors who arrive via these queries are further down the buying cycle and closer to making a purchase decision than those who come through broad searches alone.
E-E-A-T
Google’s E-E-A-T principle (Experience, Expertise, Authoritativeness, and Trustworthiness) should be at the heart of your content efforts.
E-E-A-T means that a website can show that the people who wrote the content are trustworthy experts who are knowledgeable about the subject and have relevant experience.
This is especially important if your website covers topics related to health, finance, or any other area that could have an impact on the well-being and safety of users.
These topics are also known as Your Money or Your Life (YMYL) and require a higher level of trustworthiness for rankings in SERPs.
There are several ways to prove your website meets the E-E-A-T criteria.
Here are some bedrock elements you should use – with examples:
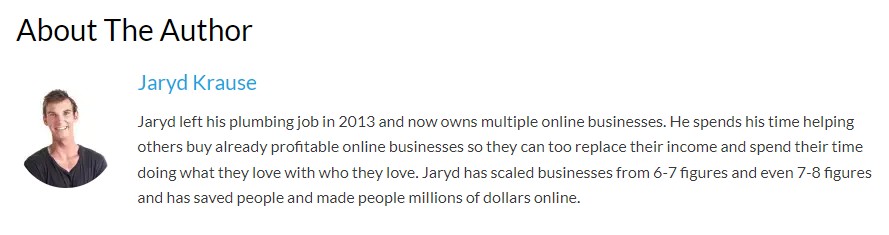
- Include bios of authors that contribute to your content.
Including any relevant qualifications they may have – as well as links to reputable sources that back up factual claims and figures used throughout it.
- Provide clear contact information.
Users should know exactly who is behind the website. Give them a way to reach out to you!

Top (header) and bottom (footer) of https://metropolitanskinclinic.com/ – there’s no question that this is a real business, right?

- Have a clear “About Us” page.
Users (and search engines) will be more likely to trust you when they know who you are. Besides, people love stories, so share your journey with the world.
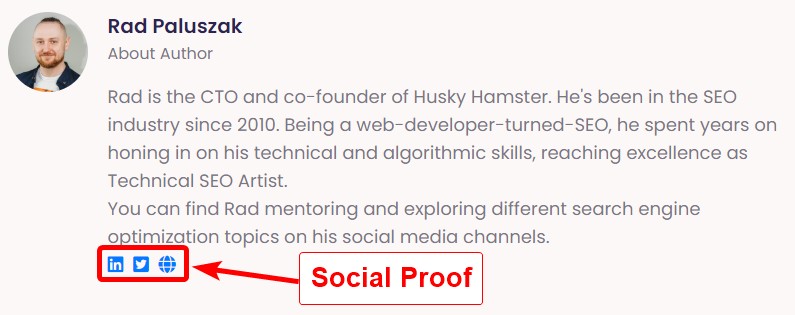
- Include links to your social media (or other assets)
Your presence should not just be limited to your website.
If you think about it, most individuals and companies have their own social media profiles.
Allowing your users to find you elsewhere, proves that you are a real entity!

- Add References and Client Reviews
Where possible, include any social proof you can to gain additional trust.

- Add necessary disclaimers.
Be honest about any possible conflicts of interest and give disclaimers when they are needed.
I’m sure you’ve seen these before:

Here’s a very useful generator, in case you ever needed to create a disclaimer for free: https://www.freeprivacypolicy.com/free-disclaimer-generator/
All this will help build trust and ensure visitors feel confident in the content they find on your website.
Allright, these are the basics behind the content. Let’s look at the links element now.
4. Links
Links play an important role in SEO, as they help demonstrate to search engines that your website is a credible source of information and should be ranked higher.
Links might also be a good authority building block, as they deliver trust signals to search engines.
When people say “links”, they might mean different things, but usually they refer to external backlinks that are placed on other websites and point at yours.
Although, when we’re considering the lingo, there are three main terms related to links you will come across: internal links, external links, and backlinks.
Let’s go over all of them.
Internal Links
Internal links are links within your site.
Here’s a good explanation of internal links by our friends at Husky Hamster:
@huskyhamster What is an internal link? An internal link is a hyperlink from one page on a website to another page on THE SAME website. Internal linking helps search engines to understand the structure of a website and to determine the importance, relevance and relation between different pages within the site. Websites with well-structured internal linking usually tend to rank better in Google organic search because they are easier for the search engine to crawl and understand. #linkbuilding #linkbuildingtips #content #website #informationarchitecture #links #seo
♬ original sound – Husky Hamster Link Building
They are essential for website navigation, as they help visitors find their way around your site quickly and easily.
To ensure you get maximum value from internal links, make sure to link any relevant content together whenever possible.
This is called contextual linking or in-content linking.
It will create a network of pages on your website (the “semantic cluster” we mentioned before) that search engine bots will find easier to follow.
Moreover, use anchor text (the words used to link) in a smart way by putting targeted keywords in them when it makes sense.
However, again, remember to avoid “keyword stuffing” (packing too many keywords in the anchors), as it’s bad for users and search engines alike.
Other than the in-content links, here are other elements that are easy to implement, while heavily helping your internal linking. I discuss them in the following sections.
Main Menu
Use your menu wisely, as this is the most important navigational element for both users and search engines.
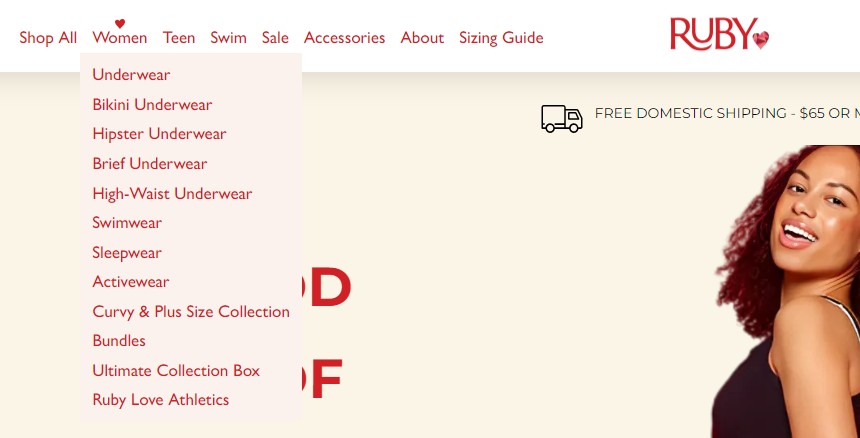
A good idea is to use good information architecture with categories and subcategories (where possible).
Example of a simple drop-down menu with logical and coherent category structure:
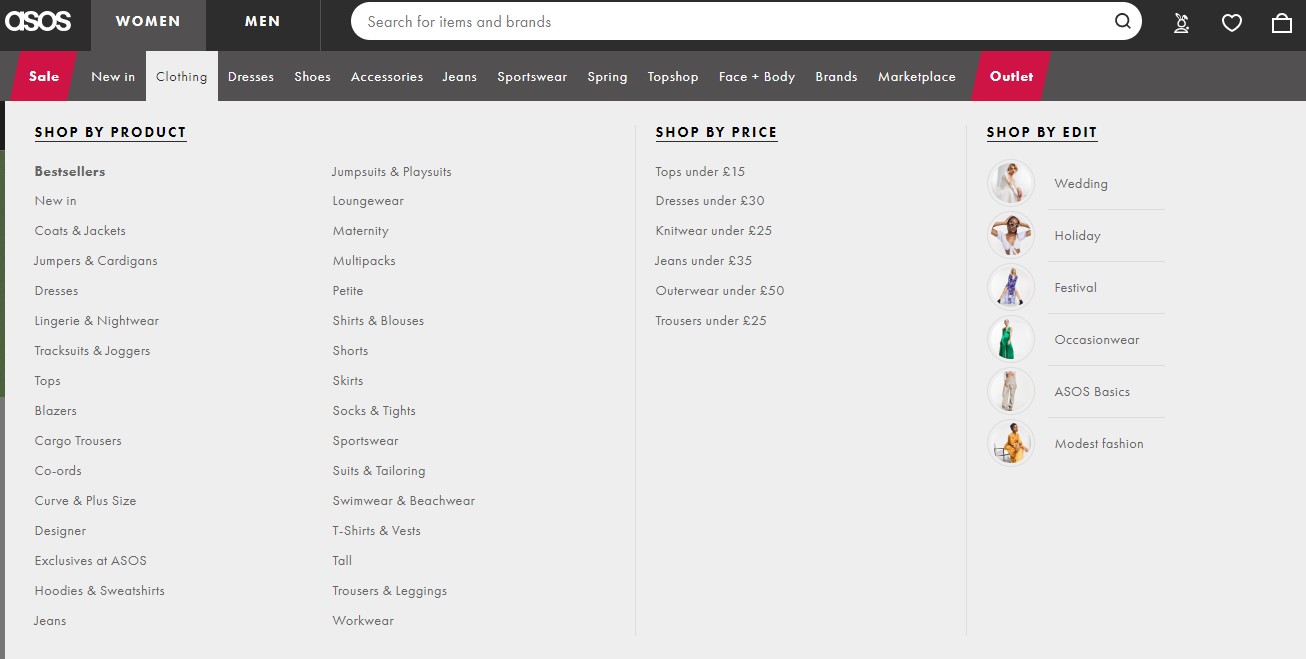
And here’s an example of mega-menu used by ASOS:
Here are some more examples and basic tips.
Sidebar
Sidebar is a secondary or tertiary navigational structure. One that is becoming less important for search engines and users due to growing mobile popularity.
However, please do your desktop users a favor and include a well-structured sidebar.
If not for the users, do it for SEO – the sidebar is still a great place to include links related to the piece of content that is currently on the page.
Some elements to include in the sidebar are:
- Search box
- Author bio and photo
- List of categories
- Related posts
- Latest posts
- Ads
- Banners and CTA
- etc.
If you want to see a really developed and good sidebar example, head over to WPBeginner and view any of the articles or categories.
Related Posts
Add “Related Posts” section to all your posts. Full stop.
It helps by improving internal navigation and relations between the posts.
Still remember the topical clusters I mentioned above? Ok, so this usually helps with that, too.
YARPP is a good and easy-to-use plugin that will sort this out for you. Here’s an example:

Breadcrumb navigation
Don’t forget about breadcrumb navigation!
This is where the hierarchical list of links provides a trail of related pages leading back up to the homepage.
It enables visitors to see the structure of your website at a glance, exactly from where they are, while also helping crawlers understand how it is organized.
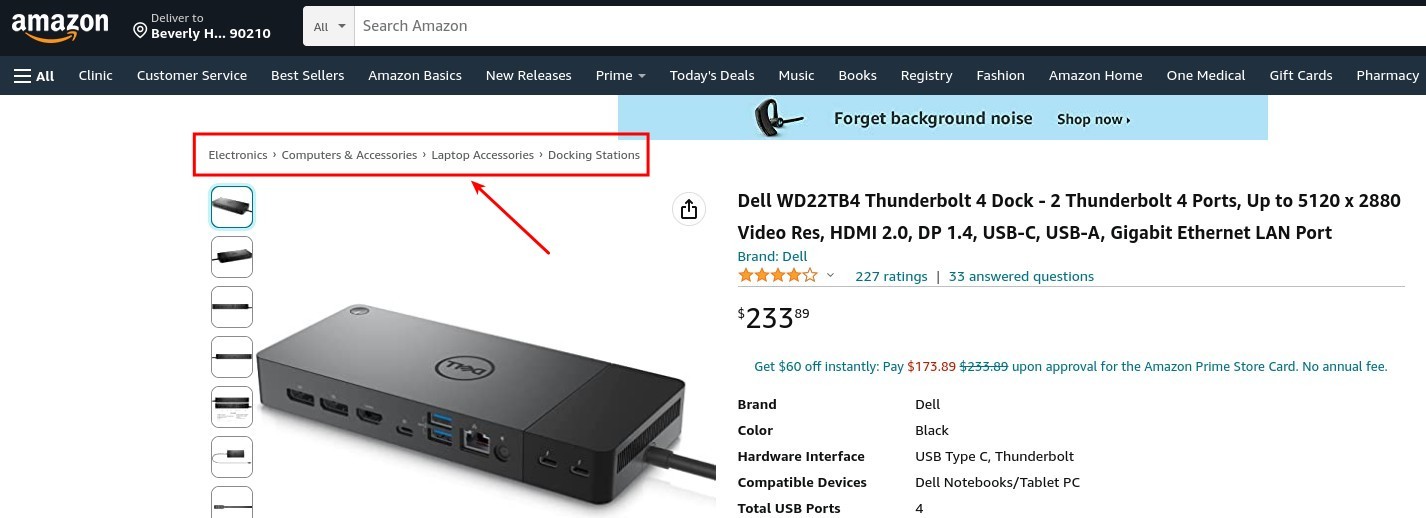
Here’s how Amazon uses breadcrumb navigation:
Footer
The footer isn’t that important for search engines, as they “know” that it’s at the end of the page and…
Well, they don’t consider the stuff at the end of the page as important.
But, it’s very useful for the users and also helps to place additional navigation to some key-pages.
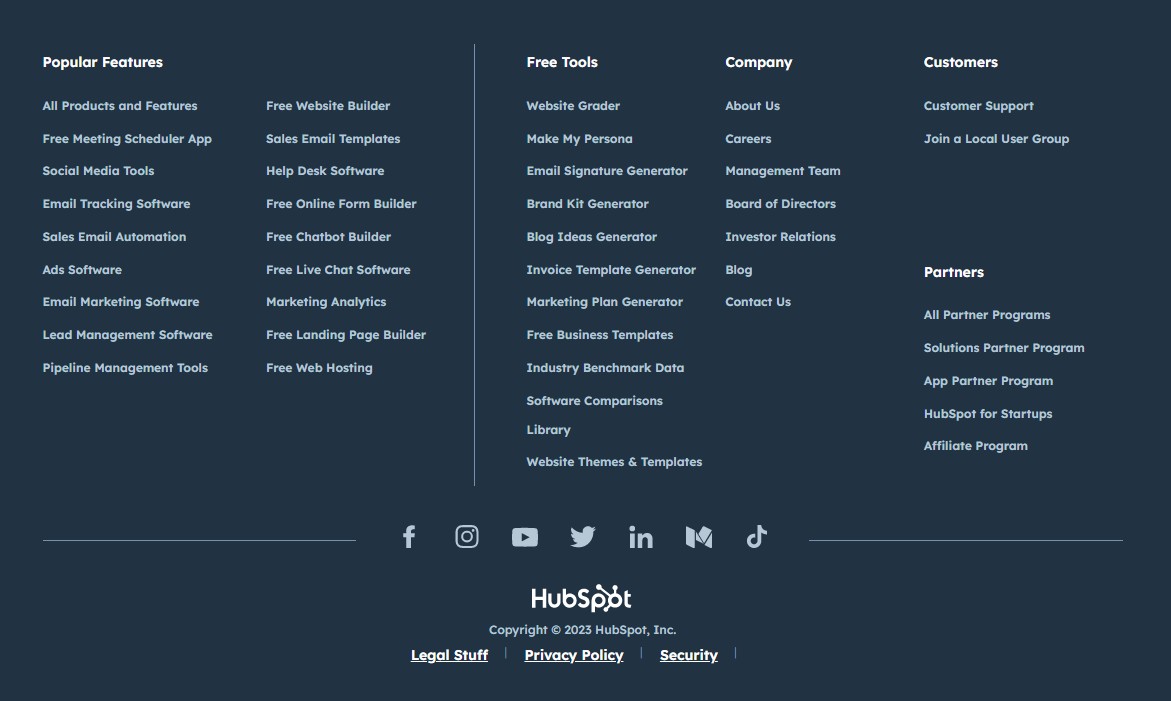
Here’s how HubSpot effectively uses their footer:
External Links
As well as linking to pages on your own website (described above), it’s good to include external links, too – and not just for SEO purposes.
Linking out to other websites adds credibility to the content you have produced.
It also encourages visitors who find your site through search engines to explore further topics related to what they’ve read.
Don’t overdo external links because you obviously don’t want to send your visitors away!
By default, when adding external links to posts or articles, the sources ought to be reliable and trustworthy.
Google does not trust just any random website that could be full of inaccuracies or misinformation.
Aim for authoritative sites, such as government bodies, educational institutions, major newspapers/magazines (e.g., The New York Times), etc., where possible.
This will help demonstrate to search engine crawlers that your content is high-quality and well-researched.
Even though it’s unlikely to be a ranking factor, some tests show that adding external links from authoritative sites helped tracked keywords move up in the rankings.
My recommended ratio is around 1-3 external links per 1,000 words.
Again, Sitebulb is our friend here and helps us check the ratio of external links.
Using the add column function, we can select the option to see the number of external links on a page, as well as the page word count.

Backlinks
Whenever someone says “backlinks,” they refer to external links that point to your site from other websites. They are part of link building.
Link building is the process of obtaining backlinks from other websites back to yours – and it’s an integral part of any successful SEO strategy.
Because quality always beats quantity when it comes to links, always focus on getting your website mentioned by well-respected sources.
Aiming for as many backlinks as possible used to be effective… like 10 years ago 😅
DO NOT TRY IT – go for quality.
The most effective way to build high-quality links is through content marketing and outreach activities.
Start by creating helpful pieces that cover topics related to your industry or niche in a comprehensive manner (while also keeping E-E-A-T and YMYL principles in mind!).
Once you’ve got some great content produced, contact other relevant sites directly and ask them if they would be interested in linking back to it where appropriate.
Chances are, you’ll get some positive responses!
You can also promote your posts via social media channels, such as Facebook, Twitter, and LinkedIn.
Alternatively, reach out again after the article has been live for a while with updates on how popular it has become since its launch date (e.g., views, shares).
I and our audience continue to buy backlink building packages from Husky Hamster as they have helped grow our businesses.
It goes without saying that link building takes time but can pay dividends over the long term if done correctly.
Plus, there are plenty of creative ways you can go about achieving this goal.
Here are some examples:
- Using services like HARO (Help A Reporter Out)
- launching competitions/giveaways where participants must share their submissions on social networks linking back to your website,
- soliciting guest blog opportunities within relevant groups or forums online,
- contributing articles/opinions/statistics/etc.,
- submitting infographics showcasing interesting data points associated with particular keywords…
There are plenty of creative ways to get links!
Speaking of backlinks …
How many backlinks do you need?
This is a very good and frequently asked question!
In general, if you want to be competitive against another competitor’s website, you need approximately 50-70% of the number of referring domains that they have.
Let’s break it down.
We said “referring domains” because you can get many links from one referring domain.
The thing is, they don’t all count the same. In fact, the more links you get from a single domain, the less “juicy” they are.
So, ideally, you should look at getting only 1 strong link from an individual domain.
Because of this, we operate with referring domains instead of individual links.
We said approximately 50-70% because we are assuming that 30-50% of their link profile includes low-quality links that don’t even count (rubbish).
In your case, however, you must build that number of good-quality links.
Let’s have a look at the example.
Your competitor has 200 RD (unique referring domains).
After looking at their link profile, we can see that they have A LOT of low-quality links – around 50% of the total.
So now head over to go to Husky Hamster and get 100 unique links (from unique referring domains) to have a chance of catching up with them.
Don’t build 100 links at once! Velocity is just as important as quality. Building too many links too fast could send a wrong signal to Google. So instead, build 25-30 every month for a few months to maintain healthy ratio of new links.
This is just an estimation, so there might be other factors that influence your performance and the individual outcomes.
Nonetheless, I think this is a good approximation.
Here’s how to check your competitors’ links using Ahrefs.
Take your top competitor domain and paste them into Ahrefs, and go into Backlinks
Ensure that the filter settings are:
- One link per domain
- Dofollow
- Have a DR higher than 10
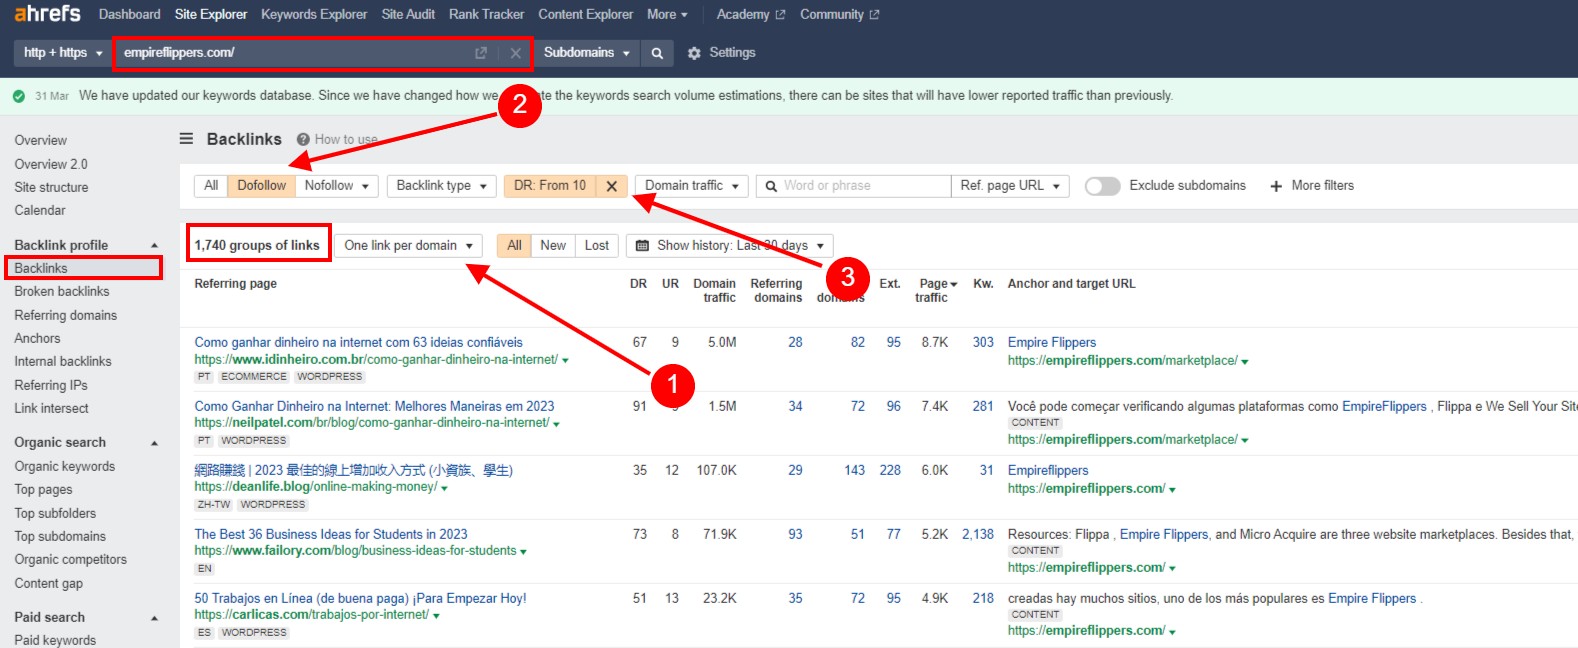
Undergoing this process gives a more realistic expectation of the number of backlinks needed as it removes much of the junk that can sometimes inflate numbers.
We can see the total number of backlinks in this case, which is 1,748.
By comparing this figure to the total number of links that this website has, we can quickly estimate how much of it is “junk”.
We can obviously repeat this process with a few other competitor domains and take the mean average, giving us a reasonable estimate of the number of links we need to build.
ALWAYS Prioritize User Experience
I’ve covered a lot of things about SEO above, but I really want to get this point across: SEO isn’t standalone.
User experience (UX) should be at the heart of everything you do, from SEO to content creation and link building.
After all, what happens if your visitors can’t navigate your website easily or find the information they need quickly…?
They won’t stick around long enough to convert!
Regardless of how well-optimized your site is for search engines.
We’ve covered some components of UX in the previous sections, but we’ll repeat them here.
Firstly, to recap their importance.
But secondly, to (again) highlight that SEO isn’t just pure marketing or technical stuff – it’s The USER stuff, first and foremost.
To ensure that users receive a seamless experience while browsing through your site – ensure the best usability.
Here are some pointers to help you with that – definitely not a full list!
- Look at page loading times.
- Make sure there are no broken links.
- Test out any forms/plug-ins/interactive elements on offer and tweak them as necessary.
- Use a nice and friendly template.
- Use color schemes and fonts judiciously throughout, so visitors don’t get overwhelmed by too many visuals.
- Pay attention to factors such as navigation menus and calls-to-action (CTAs).
- See if all buttons clearly describe what will happen when clicked upon – this helps build trust with potential customers who may not be familiar with your website yet.
- Streamline checkout processes by allowing guests purchases instead of forcing registration first.
- Include zoom functionality in product images so users can take a closer look before buying something online.
- (optionally) Add chatbots into conversations where appropriate, which enable visitors to ask questions directly within their browser window rather than having to wait for an email reply or call back.
The list goes on!
There are so many elements that we could go on and on, but it goes beyond the scope of this article.
I can summarize the best approach to User Experience as this:
Always strive towards making things easier whenever possible.
When in doubt about what to do, try using your website for a bit – just like a new user would.
You can also ask your friends and family to browse it and give you feedback.
Sometimes seemingly small changes, like the ones above, can help boost engagement rates (and user happiness) over time significantly!
Have a Strategy!
Something to also bear in mind is that most of what I shared above is reactive.
Basically going in and fixing things or making sure they’re good.
On the other side of things – just as important, or maybe even more – sits…
STRATEGY!
You want to approach your website like a business – and in business, strategy plays a key role.
Don’t just sit on your website – think about developing it. Have a plan for it.
“If you are not moving forward, you are moving backward.” – do you know this saying?
It’s exactly like this for your website!
The Internet is very alive:
- Your competitors aren’t sleeping.
- Other sites are getting links.
- New products are being released.
- Reviews get outdated.
- Years change (c’mon! Get your 2022 reviews updated to 2023 NOW!)
- Algorithms change.
- Etc.
Things rarely stay the same, so don’t you dare become stagnant!
To book a linking building package and a Strategy Call with Rad Paluszak, check this out.
Monitor, Measure, Adjust
Once your website is up and running, it’s essential to monitor its performance at all times.
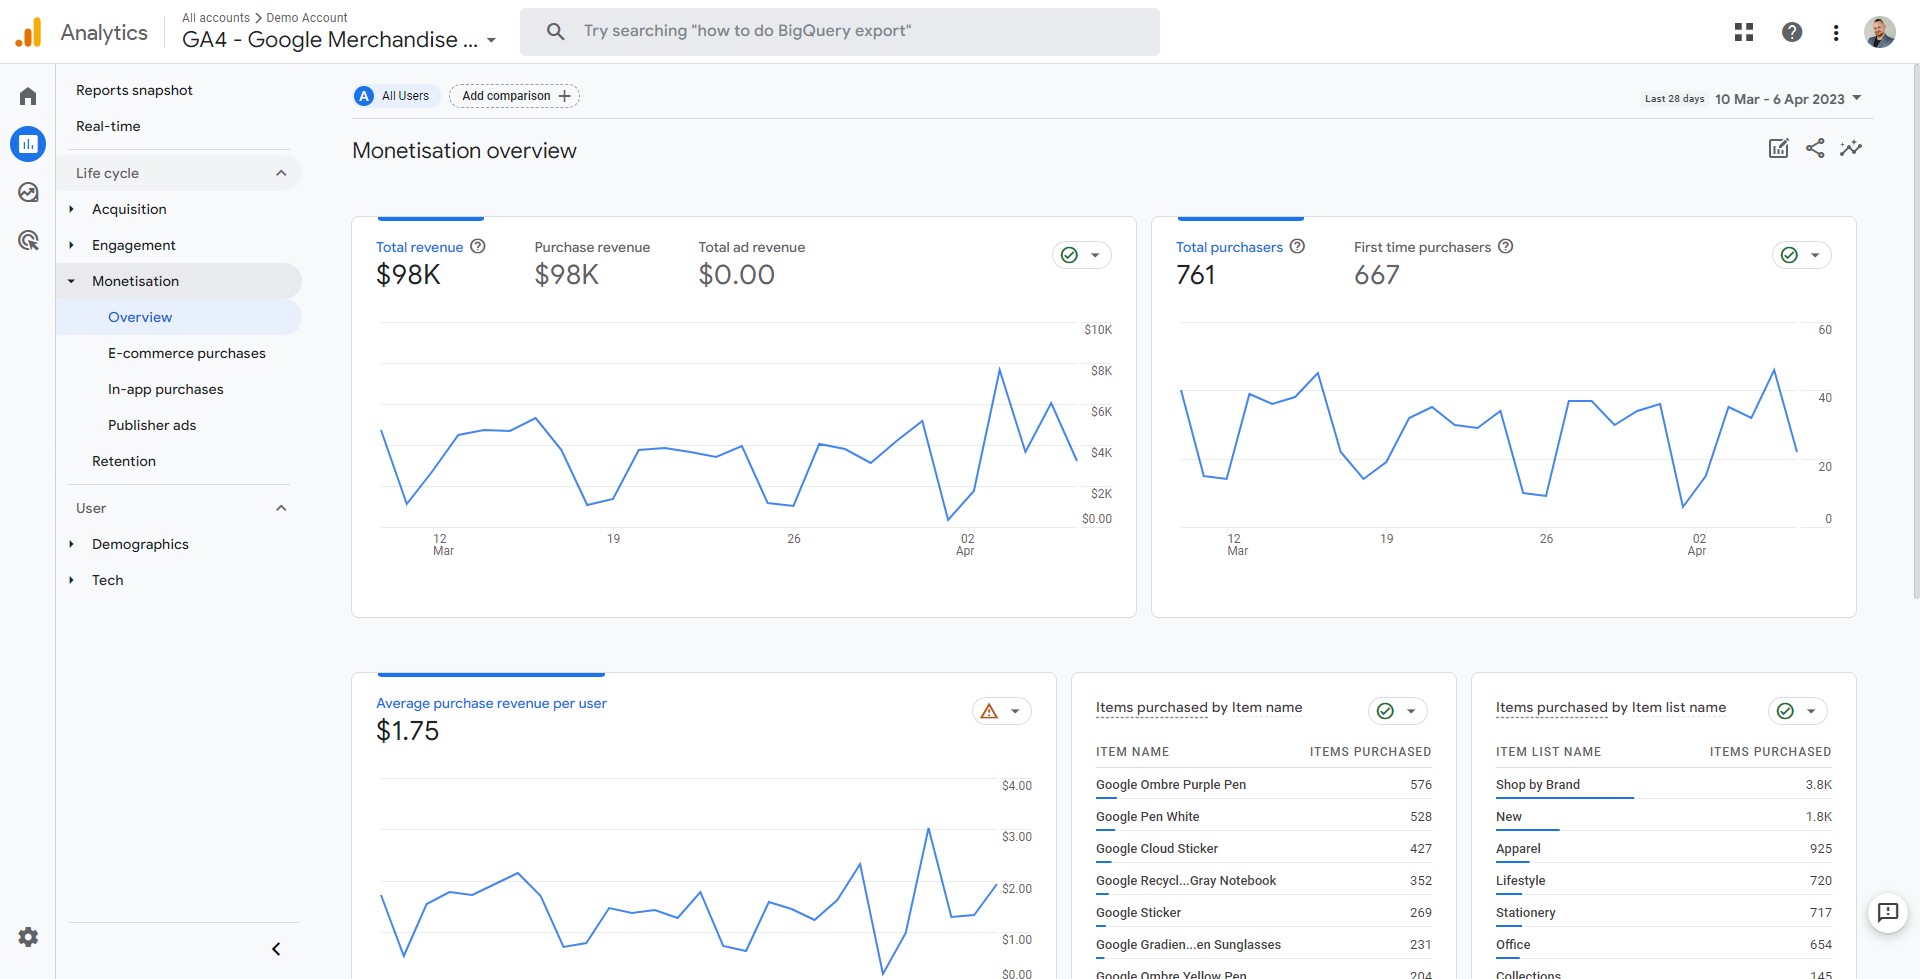
Make sure to set up analytics tools, such as Google Analytics, so you can:
- measure the number of visitors arriving at your site each day;
- identify which pages are proving most (or least) popular;
- track conversions from page views/clicks through to purchases or sign-ups…
This data will give you a good indication of where improvements need to be made in order for your website to reach its full potential.
Remember that SEO isn’t a one-time fix either.
Algorithms are always changing, so what works well today might not work as well tomorrow.
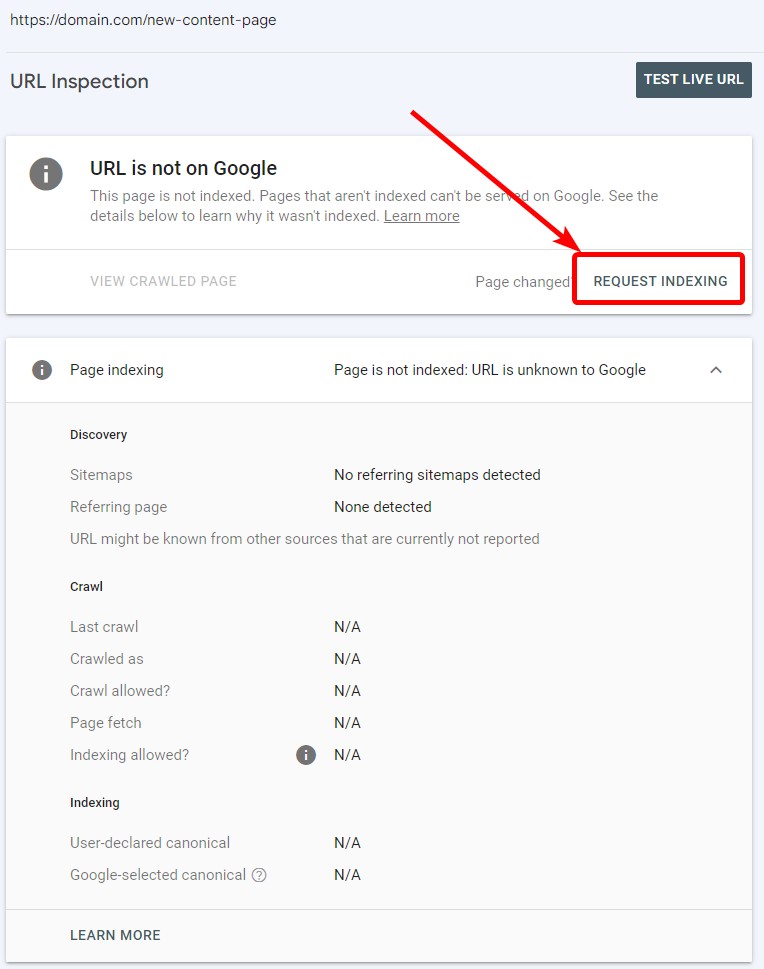
So, check the rankings of your keywords often and think about submitting new content to Google Search Console as soon as a new page gets published.
This is how you do it in GSC:
- Paste your new URL in the top bar.

- Wait for the Search Console to check it against Google’s index.
- Click Request Indexing
Also, keep an eye out for any changes in organic traffic trends over time and adjust accordingly.
If particular topics or posts suddenly receive fewer visits than expected, then look into why this might be happening and see if there is anything that needs amending before similar issues occur across other sections of the site, too!
Stay vigilant with:
- technical optimization tasks (such as fixing broken links or improving page loading speeds)
- and creative elements (like content creation/updates, link-building activities, etc.).
By doing so, you’ll ensure your website remains fresh yet also secure in its search engine standings – helping drive more users, traffic, or qualified leads over time!
Conclusion
Buying a website is an exciting endeavor, but it comes with the responsibility of ensuring it’s up to scratch and well-positioned for success.
With some planning and preparation, you can get your new website running smoothly in no time at all.
Start by auditing the platform and understanding exactly how it works from the inside out.
Then, fix technical foundations and, later, make sure to create content that’s optimized for search engine visibility. It must be considering stuff like E-E-A-T and YMYL principles.
Don’t forget about visuals either – images, videos, infographics, podcasts… all of these can help capture attention and maximize engagement with your website.
After that, build a strategy and prioritize the user experience over everything else.
Lastly, keep building links, content, and … growing!
Good luck!
Disclaimer – this post may contain affiliate links, so we may earn a small commission when you make a purchase through links on our site/posts at no additional cost to you, enjoy!
More Videos About Buying Websites: